The following link talks about this service in detail
http://apigee.com/about/solutions/pivotal-cloud-foundry-apigee
In this blog post we walk through how we would use this Service on Pivotal Cloud Foundry 1.7 to expose Telstra SMS Api.
1. First we have to deploy our application which provides access to the Public SMS Api from Telstra. This is deployed to Pivotal Cloud Foundry (PCF). The GitHub project is as follows.
https://github.com/papicella/TelstraSMSAPIPublic
2. Once deployed the application provides two REST endpoints that also includes swagger UI
Note: This Telstra API only works for Australian based mobile numbers and you will need a https://dev.telstra.com/ account to invoke the free Telstra SMS Service. The API is explained in detail at this link https://dev.telstra.com/content/sms-api-0
3. Now at this point we will need to add "Apigee Edge Service Broker for PCF" tile to Pivotal Ops Manager. You can download it from the URL below and follow the instructions to install the Tile onto the
https://network.pivotal.io/products/apigee-edge-for-pcf-service-broker
4. Once installed it will be shown as a tile on Pivotal Ops Manager as per the image below
5. To ensure it's part of our marketplace services we simply log into our PCF instance using the command line as shown below
OR from the Pivotal Apps Manager
6. Use the create-service command to create an instance of the Apigee Edge service broker as shown below
papicella@papicella:~/pivotal/services/apigee$ cf create-service apigee-edge org api-connectors-service -c api-connectors.json
Creating service instance api-connectors-service in org system / space pas as papicella@pivotal.io...
OK
api-connectors.json
{"org":"papicella", "env":"prod", "user":"papicella@pivotal.io", "pass":"yyyyyyy", "host": "apigee.net", "hostpattern": "${apigeeOrganization}-${apigeeEnvironment}.${proxyHost}"}
The JSON specifies the Apigee Edge details needed to route traffic:
- org -- Organization of the Apigee Edge proxy through which requests should be routed. You'll find this value at the top of the Edge UI while looking at the Dashboard.
- env -- Environment of the Apigee Edge proxy through which requests should be routed. You'll find this value at the top of the Edge UI while looking at the Dashboard.
- user -- Username of an Edge user who has access to create proxies. This is the username you use to log into the Edge UI.
- pass -- Password of an Edge user who has access to create proxies. The password you use to log into the Edge UI.
- host -- Edge host name to which requests to your API proxies can be sent.
- hostpattern -- Pattern for generating the API proxy URL. For example,
#{apigeeOrganization}-#{apigeeEnvironment}.#{proxyHost}for cloud accounts.
bind-route-service command to create an Edge API proxy and bind your Cloud Foundry application to the proxy. This tells the Go router to redirect requests to the Apigee Edge proxy before sending them to the Cloud Foundry application.papicella@papicella:~/pivotal/services/apigee$ cf bind-route-service pcfdemo.net api-connectors-service --hostname apples-springboot-telstrasms
Binding route apples-springboot-telstrasms.pcfdemo.net to service instance api-connectors-service in org system / space pas as papicella@pivotal.io...
OK
Note: The hostname is the name of your REST based application
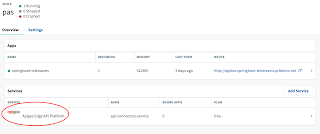
8. With the service created it will then exist within the space as per the image below
9. Click on the service as shown below
10. Click on Manage as shown below
11. In the Apigee management console, under APIs > API proxies, locate the name of the proxy you just created as shown below
12. Click the PCF proxy's name to view its overview page.
13. Click the Trace tab, the click the Start Trace Session button.
14. Back at the command line, access the REST based application endpoint for the Telstra SMS Service as shown below.
papicella@papicella:~/pivotal/services/apigee$ curl "http://apples-springboot-telstrasms.pcfdemo.net/telstra/sms?to=0411151350&appkey=apples-key&appsecret=apples-password"
{"messageId":"5188529E91E847589079BAFDBF8B63FF"}
15. Return to the Apigee Management Console to verify Trace Output and a Successful HTTP 200 call. The new proxy is just a pass-through. But it's ready for you or someone on your team to add policies to define security, traffic management, and more.
More Information
Pivotal Cloud Foundry and Apigee - http://apigee.com/about/solutions/pivotal-cloud-foundry-apigee
Pivotal Cloud Foundry - http://pivotal.io/platform


