Search This Blog

Friday, 20 April 2018

Using/Verifying the Autoscale service from Apps Manager UI in 5 minutes

Recently at a customer site I was asked to show how the Autoscale service shipped by default with Pivotal Cloud Foundry would work. Here is how we demoed that in less then 5 minutes.

1. Select an application to Autoscale and click on the "Autoscaling" radio option.


2. Select "Manage Autoscaling" link as shown below.


3. Set the maximum instance limit to "4" and click Save as shown below. You can also set minimum to 1 instance if you want to which will make it easier to verify the scaling of instances as one instance can easily be put under pressure.


4. Now lets set a "Scaling Rule" by clicking on the "Edit" link as shown below.


5. Now lets add a CPU rule by clicking on the "Add" link as shown below.


6. Now define a CPU rule as shown below and click on Save. Don't forget to make it active using the radio option. In this example we use very low threshold BUT it would be better to increase this to something more realistic like 30% and 60% respectively.


Now at this point we are ready to test the Autoscale service BUT to do that we are going to have to create some load. Many different ways to do that but "ab" on my Mac was the fastest way.

8. Create some load on an endpoint for your application to force CPU utilization to increase as shown below

pasapicella@pas-macbook:~$ ab -n 10000 -c 25 http://springboot-actuator-appsmanager-delightful-jaguar.cfapps.io/employees
This is ApacheBench, Version 2.3 <$Revision: 1807734 $>
Copyright 1996 Adam Twiss, Zeus Technology Ltd, http://www.zeustech.net/
Licensed to The Apache Software Foundation, http://www.apache.org/

Benchmarking springboot-actuator-appsmanager-delightful-jaguar.cfapps.io (be patient)
Completed 1000 requests
Completed 2000 requests
Completed 3000 requests
Completed 4000 requests
Completed 5000 requests
Completed 6000 requests
Completed 7000 requests
Completed 8000 requests
Completed 9000 requests
Completed 10000 requests
Finished 10000 requests

....

9. If you return to Apps Manager UI soon enough you will see that the Autoscale service has fired events to add more instances as per the screen shots below.


It's worth noting that the CF CLI Plugin for Autoscale can also show us what we have defined as as shown below. More information on this plugin is as follows

https://docs.run.pivotal.io/appsman-services/autoscaler/using-autoscaler-cli.html#install

View which applications are using the Autoscaler service:

pasapicella@pas-macbook:~$ cf autoscaling-apps
Presenting autoscaler apps in org apples-pivotal-org / space development as papicella@pivotal.io
OK
Name                              Guid                                   Enabled   Min Instances   Max Instances
springboot-actuator-appsmanager   6c137fea-6a99-4069-8031-a2aa3978804c   true      2               4

View events for an application that has Autoscaler service bound to it:

pasapicella@pas-macbook:~$ cf autoscaling-events springboot-actuator-appsmanager
Presenting autoscaler events for app springboot-actuator-appsmanager for org apples-pivotal-org / space development as papicella@pivotal.io
OK
Time                   Description
2018-04-20T09:56:30Z   Scaled down from 3 to 2 instances. All metrics are currently below minimum thresholds.
2018-04-20T09:55:56Z   Scaled down from 4 to 3 instances. All metrics are currently below minimum thresholds.
2018-04-20T09:54:46Z   Can not scale up. At max limit of 4 instances. Current CPU of 20.75% is above upper threshold of 8.00%.
2018-04-20T09:54:11Z   Can not scale up. At max limit of 4 instances. Current CPU of 30.53% is above upper threshold of 8.00%.
2018-04-20T09:53:36Z   Can not scale up. At max limit of 4 instances. Current CPU of 32.14% is above upper threshold of 8.00%.
2018-04-20T09:53:02Z   Can not scale up. At max limit of 4 instances. Current CPU of 31.51% is above upper threshold of 8.00%.
2018-04-20T09:52:27Z   Scaled up from 3 to 4 instances. Current CPU of 19.59% is above upper threshold of 8.00%.
2018-04-20T09:51:51Z   Scaled up from 2 to 3 instances. Current CPU of 8.99% is above upper threshold of 8.00%.
2018-04-20T09:13:24Z   Scaling from 1 to 2 instances: app below minimum instance limit
2018-04-20T09:13:23Z   Enabled autoscaling.

More Information

https://docs.run.pivotal.io/appsman-services/autoscaler/using-autoscaler-cli.html#install

https://docs.run.pivotal.io/appsman-services/autoscaler/using-autoscaler.html

Tuesday, 10 April 2018

Spring Cloud Services CF CLI Plugin

The Spring Cloud Services plugin for the Cloud Foundry Command Line Interface tool (cf CLI) adds commands for interacting with Spring Cloud Services service instances. It provides easy access to functionality relating to the Config Server and Service Registry; for example, it can be used to send values to a Config Server service instance for encryption or to list all applications registered with a Service Registry service instance.

Here is a simple example of how we can view various bound apps for a Service Registry

1. Install the CF CLI Plugin for Spring Cloud Services using the link below

$ cf add-plugin-repo CF-Community https://plugins.cloudfoundry.org

$ cf install-plugin -r CF-Community "Spring Cloud Services"

2. Now in Apps Manager UI we have a Service Registry instance with some bound micro services as shown below


3. Now we can use the SCS CF CLI Plugin to also get this information

pasapicella@pas-macbook:~$ cf service-registry-list eureka-service
Listing service registry eureka-service in org apples-pivotal-org / space scs-demo as papicella@pivotal.io...
OK

Service instance: eureka-service
Server URL: https://eureka-fcf42b1c-6b85-444c-9a43-fee82f2c68c3.cfapps.io/

eureka app name cf app name    cf instance index zone      status
EDGE-SERVICE    edge-service   0                 cfapps.io UP
COFFEE-SERVICE  coffee-service 0                 cfapps.io UP

The full list of plugin commands are as shown in the screen shot below. 

Note: Use "cf plugins" to get this list once installed


More Information

http://docs.pivotal.io/spring-cloud-services/1-5/common/cf-cli-plugin.html

Wednesday, 4 April 2018

Deploying my first Pivotal Container Service (PKS) workload to my PKS cluster

If you followed along on the previous blogs you would of installed PKS 1.0 on GCP (Google Cloud Platform) and created your first PKS cluster and wired it into kubectl as well as provided an external load balancer as per the previous two posts.

Previous posts:

Install Pivotal Container Service (PKS) on GCP and getting started
http://theblasfrompas.blogspot.com.au/2018/04/install-pivotal-container-service-pks.html

Wiring kubectl / Setup external LB on GCP into Pivotal Container Service (PKS) clusters to get started
http://theblasfrompas.blogspot.com.au/2018/04/wiring-kubectl-setup-external-lb-on-gcp.html

So lets now create our first workload as shown below

1. Download YML demo from here

https://github.com/cloudfoundry-incubator/kubo-ci/blob/master/specs/nginx-lb.yml

2. Deploy as shown below

pasapicella@pas-macbook:~/pivotal/GCP/install/21/PKS/demo-workload$ kubectl create -f nginx-lb.yml
service "nginx" created
deployment "nginx" created

3. Check current status

pasapicella@pas-macbook:~/pivotal/GCP/install/21/PKS/demo-workload$ kubectl get pods
NAME                     READY     STATUS    RESTARTS   AGE
nginx-679dc9c764-8cwzq   1/1       Running   0          22s
nginx-679dc9c764-p8tf2   1/1       Running   0          22s
nginx-679dc9c764-s79mp   1/1       Running   0          22s

4. Wait for External IP address of the nginx service to be assigned

pasapicella@pas-macbook:~/pivotal/GCP/install/21/PKS/demo-workload$ kubectl get svc
NAME         TYPE           CLUSTER-IP       EXTERNAL-IP     PORT(S)        AGE
kubernetes   ClusterIP      10.100.200.1               443/TCP        17h
nginx        LoadBalancer   10.100.200.143   35.189.23.119   80:30481/TCP   1m

5. In a browser access the K8's workload as follows, using the external IP

http://35.189.23.119


More Info

https://docs.pivotal.io/runtimes/pks/1-0/index.html

Wiring kubectl / Setup external LB on GCP into Pivotal Container Service (PKS) clusters to get started

Now that I have PCF 2.1 running with PKS 1.0 installed and a cluster up and running how would I get started accessing that cluster? Here are the steps for GCP (Google Cloud Platform) install of PCF 2.1 with PKS 1.0. It goes through the requirements around an External LB for the cluster as well as wiring kubectl into the cluster to get started creating deployments.

Previous blog as follows:

http://theblasfrompas.blogspot.com.au/2018/04/install-pivotal-container-service-pks.html

1. First we will want an external Load Balancer for our K8's clusters which will need to exist and it would be a TCP Load balancer using Port 8443 which is the port the master node would run on. The external IP address is what you will need to use in the next step


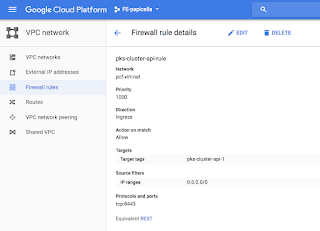
2. Create a Firewall Rule for the LB with details as follows.

Note: the LB name is "pks-cluster-api-1". Make sure to include the network tag and select the network you installed PKS on.

  • Network: Make sure to select the right network. Choose the value that matches with the VPC Network name you installed PKS on
  • Ingress - Allow
  • Target: pks-cluster-api-1
  • Source: 0.0.0.0/0
  • Ports: tcp:8443


3. Now you could easily just create a cluster using the external IP address from above or use a DNS entry which is mapped to the external IP address which is what I have done so I have use a FQDN instead

pasapicella@pas-macbook:~$ pks create-cluster my-cluster --external-hostname cluster1.pks.pas-apples.online --plan small

Name:                     my-cluster
Plan Name:                small
UUID:                     64a086ce-c94f-4c51-95f8-5a5edb3d1476
Last Action:              CREATE
Last Action State:        in progress
Last Action Description:  Creating cluster
Kubernetes Master Host:   cluster1.pks.pas-apples.online
Kubernetes Master Port:   8443
Worker Instances:         3
Kubernetes Master IP(s):  In Progress


4. Now just wait a while while it creates a VM's and runs some tests , it's roughly around 10 minutes. Once done you will see the cluster as created as follows

pasapicella@pas-macbook:~/pivotal/GCP/install/21/PKS$ pks list-clusters

Name        Plan Name  UUID                                  Status     Action
my-cluster  small      64a086ce-c94f-4c51-95f8-5a5edb3d1476  succeeded  CREATE

5. Now one of the VM's created would be the master Vm for the cluster , their a few ways to determine the master VM as shown below.

5.1. Use GCP Console VM instances page and filter by "master"


5.2. Run a bosh command to view the VM's of your deployments. We are interested in the VM's for our cluster service. The master instance is named as "master/ID" as shown below.

$ bosh -e gcp vms --column=Instance --column "Process State" --column "VM CID"

Task 187. Done

Deployment 'service-instance_64a086ce-c94f-4c51-95f8-5a5edb3d1476'

Instance                                     Process State  VM CID
master/13b42afb-bd7c-4141-95e4-68e8579b015e  running        vm-4cfe9d2e-b26c-495c-4a62-77753ce792ca
worker/490a184e-575b-43ab-b8d0-169de6d708ad  running        vm-70cd3928-317c-400f-45ab-caf6fa8bd3a4
worker/79a51a29-2cef-47f1-a6e1-25580fcc58e5  running        vm-e3aa47d8-bb64-4feb-4823-067d7a4d4f2c
worker/f1f093e2-88bd-48ae-8ffe-b06944ea0a9b  running        vm-e14dde3f-b6fa-4dca-7f82-561da9c03d33

4 vms

6. Attach the VM to the load balancer backend configuration as shown below.


7. Now we can get the credentials from PKS CLI and pass them to kubectl as shown below

pasapicella@pas-macbook:~/pivotal/GCP/install/21/PKS$ pks get-credentials my-cluster

Fetching credentials for cluster my-cluster.
Context set for cluster my-cluster.

You can now switch between clusters by using:
$kubectl config use-context

pasapicella@pas-macbook:~/pivotal/GCP/install/21/PKS$ kubectl cluster-info
Kubernetes master is running at https://cluster1.pks.domain-name:8443
Heapster is running at https://cluster1.pks.domain-name:8443/api/v1/namespaces/kube-system/services/heapster/proxy
KubeDNS is running at https://cluster1.pks.domain-name:8443/api/v1/namespaces/kube-system/services/kube-dns/proxy
monitoring-influxdb is running at https://cluster1.pks.domain-name:8443/api/v1/namespaces/kube-system/services/monitoring-influxdb/proxy

8. To verify it worked for you here are some commands you would run. The "kubectl cluster-info" is one of those.

pasapicella@pas-macbook:~/pivotal/GCP/install/21/PKS$ kubectl get componentstatus
NAME                 STATUS    MESSAGE              ERROR
controller-manager   Healthy   ok
scheduler            Healthy   ok
etcd-0               Healthy   {"health": "true"}

pasapicella@pas-macbook:~/pivotal/GCP/install/21/PKS$ kubectl get pods
No resources found.

pasapicella@pas-macbook:~/pivotal/GCP/install/21/PKS$ kubectl get deployments
No resources found.

9. Finally lets start the Kubernetes UI to monitor this cluster. We do that as easily as this.

pasapicella@pas-macbook:~/pivotal/GCP/install/21/PKS$ kubectl proxy
Starting to serve on 127.0.0.1:8001  

The UI URL requires you to append /ui to the url above

Eg: http://127.0.0.1:8001/ui

Note: It will prompt you for the kubectl config file which would be in the $HOME/.kube/config file. Failure to present this means the UI won't show you much and give lost of warnings


More Info

https://docs.pivotal.io/runtimes/pks/1-0/index.html

Install Pivotal Container Service (PKS) on GCP and getting started

With the release of Pivotal Cloud Foundry 2.1 (PCF) I decided this time to install Pivotal Application Service (PAS) as well as Pivotal Container Service (PKS) using the one Bosh Director which isn't recommended for production installs BUT ok for dev installs. Once installed you will have both the PAS tile and PKS tile as shown below.

https://content.pivotal.io/blog/pivotal-cloud-foundry-2-1-adds-cloud-native-net-envoy-native-service-discovery-to-boost-your-transformation


So here is how to get started with PKS once it's installed

1. Create a user for the PKS client to login with.

1.1. ssh into the ops manager VM

1.2. Target the UAA endpoint for PKS this was setup in the PKS tile

ubuntu@opsman-pcf:~$ uaac target https://PKS-ENDPOINT:8443 --skip-ssl-validation
Unknown key: Max-Age = 86400

Target: https://PKS-ENDPOINT:8443

1.3. Authenticate with UAA using the secret you retrieve from the PKS tile / Credentials tab as shown in the image below. Run the following command, replacing UAA-ADMIN-SECRET with your UAA admin secret

ubuntu@opsman-pcf:~$ uaac token client get admin -s UAA-ADMIN-SECRET
Unknown key: Max-Age = 86400

Successfully fetched token via client credentials grant.
Target: https://PKS-ENDPIONT:8443
Context: admin, from client admin


1.4. Create an ADMIN user as shown below using the UAA-ADMIN-SECRET password obtained form ops manager UI as shown above

ubuntu@opsman-pcf:~$ uaac user add pas --emails papicella@pivotal.io -p PASSWD
user account successfully added

ubuntu@opsman-pcf:~$ uaac member add pks.clusters.admin pas
success

2. Now lets login using the PKS CLI with a new admin user we created

pasapicella@pas-macbook:~$ pks login -a PKS-ENDPOINT -u pas -p PASSWD -k

API Endpoint: pks-api.pks.pas-apples.online
User: pas

3. You can test whether you have a DNS issue with a command as follows. 

Note: A test as follows determines any DNS issues you may have

pasapicella@pas-macbook:~$ nc -vz PKS-ENDPOINT 8443
found 0 associations
found 1 connections:
     1: flags=82
outif en0
src 192.168.1.111 port 62124
dst 35.189.1.209 port 8443
rank info not available
TCP aux info available

Connection to PKS-ENDPOINT port 8443 [tcp/pcsync-https] succeeded!

4. You can run a simple command to verify your connected as follows, below shows no K8's clusters exist at this stage

pasapicella@pas-macbook:~$ pks list-clusters

Name  Plan Name  UUID  Status  Action

You can use PKS CLI to create a new cluster, view clusters, resize clusters etc

pasapicella@pas-macbook:~$ pks

The Pivotal Container Service (PKS) CLI is used to create, manage, and delete Kubernetes clusters. To deploy workloads to a Kubernetes cluster created using the PKS CLI, use the Kubernetes CLI, kubectl.

Version: 1.0.0-build.3

Note: The PKS CLI is under development, and is subject to change at any time.

Usage:
  pks [command]

Available Commands:
  cluster         View the details of the cluster
  clusters        Show all clusters created with PKS
  create-cluster  Creates a kubernetes cluster, requires cluster name and an external host name
  delete-cluster  Deletes a kubernetes cluster, requires cluster name
  get-credentials Allows you to connect to a cluster and use kubectl
  help            Help about any command
  login           Login to PKS
  logout          Logs user out of the PKS API
  plans           View the preconfigured plans available
  resize          Increases the number of worker nodes for a cluster

Flags:
  -h, --help      help for pks
      --version   version for pks

Use "pks [command] --help" for more information about a command.

5. You would create a cluster as follows now you have logged in and yu will get aK8's cluster to begin working with

pasapicella@pas-macbook:~$ pks create-cluster my-cluster --external-hostname EXT-LB-HOST --plan small

Name:                     my-cluster
Plan Name:                small
UUID:                     64a086ce-c94f-4c51-95f8-5a5edb3d1476
Last Action:              CREATE
Last Action State:        in progress
Last Action Description:  Creating cluster
Kubernetes Master Host:   cluster1.FQDN
Kubernetes Master Port:   8443
Worker Instances:         3
Kubernetes Master IP(s):  In Progress

Finally when done you will see "Last Action:" as "succeeded" as shown below

pasapicella@pas-macbook:~$ pks cluster my-cluster

Name:                     my-cluster
Plan Name:                small
UUID:                     64a086ce-c94f-4c51-95f8-5a5edb3d1476
Last Action:              CREATE
Last Action State:        succeeded
Last Action Description:  Instance provisioning completed
Kubernetes Master Host:   cluster1.FQDN
Kubernetes Master Port:   8443
Worker Instances:         3
Kubernetes Master IP(s):  MASTER-IP-ADDRESS

More Info

https://docs.pivotal.io/runtimes/pks/1-0/index.html