By default if you push a java application into public Bluemix you will use the Liberty java buildpack. If you want to use tomcat you can do that as follows.
1. Show the buildpacks available as follows
> cf buildpacks
2. The buildpack which uses Tomcat is as follows
java_buildpack
3. Specify you would like to use the buildpack as shown below when using
cf push pas-props -d mybluemix.net -i 1 -m 256M -b java_buildpack -p props.war
Example:
pas@Pass-MacBook-Pro-2:~/bluemix-apps/simple-java$ cf push pas-props -d mybluemix.net -i 1 -m 256M -b java_buildpack -p props.war
Creating app pas-props in org pasapi@au1.ibm.com / space dev as pasapi@au1.ibm.com...
OK
Creating route pas-props.mybluemix.net...
OK
Binding pas-props.mybluemix.net to pas-props...
OK
Uploading pas-props...
Uploading app files from: props.war
Uploading 2.9K, 6 files
Done uploading
OK
Starting app pas-props in org pasapi@au1.ibm.com / space dev as pasapi@au1.ibm.com...
-----> Downloaded app package (4.0K)
-----> Java Buildpack Version: v3.0 | https://github.com/cloudfoundry/java-buildpack.git#3bd15e1
-----> Downloading Open Jdk JRE 1.8.0_51 from https://download.run.pivotal.io/openjdk/lucid/x86_64/openjdk-1.8.0_51.tar.gz (11.6s)
Expanding Open Jdk JRE to .java-buildpack/open_jdk_jre (1.2s)
-----> Downloading Tomcat Instance 8.0.24 from https://download.run.pivotal.io/tomcat/tomcat-8.0.24.tar.gz (2.4s)
Expanding Tomcat to .java-buildpack/tomcat (0.1s)
-----> Downloading Tomcat Lifecycle Support 2.4.0_RELEASE from https://download.run.pivotal.io/tomcat-lifecycle-support/tomcat-lifecycle-support-2.4.0_RELEASE.jar (0.1s)
-----> Downloading Tomcat Logging Support 2.4.0_RELEASE from https://download.run.pivotal.io/tomcat-logging-support/tomcat-logging-support-2.4.0_RELEASE.jar (0.4s)
-----> Downloading Tomcat Access Logging Support 2.4.0_RELEASE from https://download.run.pivotal.io/tomcat-access-logging-support/tomcat-access-logging-support-2.4.0_RELEASE.jar (0.4s)
-----> Uploading droplet (50M)
0 of 1 instances running, 1 starting
1 of 1 instances running
App started
OK
App pas-props was started using this command `JAVA_HOME=$PWD/.java-buildpack/open_jdk_jre JAVA_OPTS="-Djava.io.tmpdir=$TMPDIR -XX:OnOutOfMemoryError=$PWD/.java-buildpack/open_jdk_jre/bin/killjava.sh -Xmx160M -Xms160M -XX:MaxMetaspaceSize=64M -XX:MetaspaceSize=64M -Xss853K -Daccess.logging.enabled=false -Dhttp.port=$PORT" $PWD/.java-buildpack/tomcat/bin/catalina.sh run`
Showing health and status for app pas-props in org pasapi@au1.ibm.com / space dev as pasapi@au1.ibm.com...
OK
requested state: started
instances: 1/1
usage: 256M x 1 instances
urls: pas-props.mybluemix.net
last uploaded: Mon Aug 3 21:40:36 UTC 2015
state since cpu memory disk details
#0 running 2015-08-03 02:41:47 PM 0.0% 136.7M of 256M 125.7M of 1G
Showing posts with label Tomcat. Show all posts
Showing posts with label Tomcat. Show all posts
Tuesday, 4 August 2015


Monday, 31 May 2010
Tomcat 6.0 / UCP Data Source Setup
To setup tomcat to use UCP as it's data source implementation here are the steps. I used 11.2 JDBC driver and UCP jar files to connect to a 11.2.0.1 RDBMS.
1. Copy ojdbc6.jar and ucp.jar into $TOMCAT_HOME/lib directory. You can download those JAR files from here.
http://www.oracle.com/technology/software/tech/java/sqlj_jdbc/index.html
2. Add your Data Source setup in $TOMCAT_HOME/conf/server.xml as follows.
3. In your web projects you deploy to tomcat add the following to web.xml
4. Your code to lookup the data source would be as follows.
Note: The dataSouceLocation would be "jdbc/UCPPool"
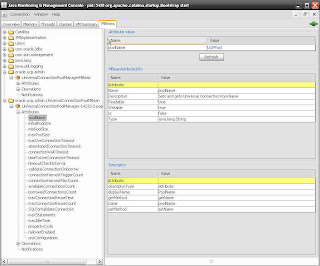
5. Finally verify using jconsole that indeed your using UCP. In the example below we are verifying that the pool named "UCPPool" is indeed created.
1. Copy ojdbc6.jar and ucp.jar into $TOMCAT_HOME/lib directory. You can download those JAR files from here.
http://www.oracle.com/technology/software/tech/java/sqlj_jdbc/index.html
2. Add your Data Source setup in $TOMCAT_HOME/conf/server.xml as follows.
<!-- Define the default virtual host
Note: XML Schema validation will not work with Xerces 2.2.
-->
<Host name="localhost"  appBase="webapps"
 unpackWARs="true" autoDeploy="true"
 xmlValidation="false" xmlNamespaceAware="false">

<Context docBase="demods" path="/demods" reloadable="true">
<Resource name="jdbc/UCPPool"
      auth="Container"
      factory="oracle.ucp.jdbc.PoolDataSourceImpl"
      type="oracle.ucp.jdbc.PoolDataSource"
      description="Pas testing UCP Pool in Tomcat"
      connectionFactoryClassName="oracle.jdbc.pool.OracleDataSource"
      minPoolSize="2"
      maxPoolSize="5"
      inactiveConnectionTimeout="20"
      user="scott"
      password="tiger"
      url="jdbc:oracle:thin:@(DESCRIPTION=(ADDRESS=(PROTOCOL=TCP)
           (HOST=beast.au.oracle.com)(PORT=1523))(CONNECT_DATA=
           (SERVICE_NAME=linux11gr2)))"
      connectionPoolName="UCPPool"
      validateConnectionOnBorrow="true"
      sqlForValidateConnection="select 1 from DUAL" />
</Context>
</Host>
3. In your web projects you deploy to tomcat add the following to web.xml
<resource-ref>
  <res-ref-name>jdbc/UCPPool</res-ref-name>
  <res-type>javax.sql.DataSource</res-type>
  <res-auth>Container</res-auth>
</resource-ref>
4. Your code to lookup the data source would be as follows.
private DataSource getDataSource (String dataSourceLocation) throws NamingException
{
  // Get a context for the JNDI look up
  Context ctx = new InitialContext();
  Context envContext = (Context) ctx.lookup("java:/comp/env");

  // Look up a data source
  javax.sql.DataSource ds
   = (javax.sql.DataSource) envContext.lookup (dataSourceLocation);


return ds;
}

private Connection getConnection (DataSource ds) throws SQLException
{
  Connection conn = null;
  // Get a connection object
  conn = ds.getConnection();

  return conn;
}
Note: The dataSouceLocation would be "jdbc/UCPPool"
5. Finally verify using jconsole that indeed your using UCP. In the example below we are verifying that the pool named "UCPPool" is indeed created.

Thursday, 2 April 2009
CYGWIN Script to copy ADF 11g JARS required for Tomcat
A work colleague told me he had to setup ADF 11g on tomcat 6.x and was lead to this link on what JAR files was required to be copied over to the %CATALINA_HOME%/lib folder.
http://blogs.oracle.com/dana/2009/01/how_to_deploy_a_11g_adf_applic_1.html
Here is a small script I wrote which will copy all those JAR files into a TEMP directory to save you time trying to find them one by one. This is a CYGWIN script as I don't know how to write BAT files.
1. Go into your JDeveloper 11g root directory as follows
papicell@papicell-au ~/d/jdev11g-boxer
2. Create a script as follows called "doCopyADF.sh"
#!/bin/sh
COPY_DIR=/cygdrive/d/temp/adf11g
export COPY_DIR;
cat adfjars.txt | while read filename
do
echo "Copying file $filename"
echo ""
find . -name "$filename" -exec cp {} $COPY_DIR \;
done
echo "All files copied.."
3. Now before you run it we need to create a list of ADF 11g JAR files it needs to find in a file called "adfjars.txt".
I simple used VI to create the list of files we need which we retrieved from the blog entry above.
adf-controller-api.jar
adf-controller-rt-common.jar
adf-controller.jar
adf-faces-databinding-rt.jar
adf-pageflow-dtrt.jar
adf-pageflow-fwk.jar
adf-pageflow-impl.jar
adf-pageflow-rc.jar
adf-richclient-api-11.jar
adf-richclient-impl-11.jar
adf-share-base.jar
adf-share-ca.jar
adf-share-support.jar
adflibfilter.jar
adflogginghandler.jar
adfm.jar
adfmweb.jar
cache.jar
commons-el.jar
db-ca.jar
dms.jar
dvt-faces.jar
dvt-jclient.jar
dvt-utils.jar
fmw_audit.jar
identitystore.jar
inspect4.jar
javatools-nodeps.jar
javax.management.j2ee_1.0.jar
jewt4.jar
jmxframework.jar
jmxspi.jar
jps-api.jar
jps-common.jar
jps-ee.jar
jps-internal.jar
jps-unsupported-api.jar
jsf-api.jar
jsf-ri.jar
jstl.jar
mdsrt.jar
ojdbc6.jar
oracle-el.jar
oraclepki.jar
org.apache.commons.beanutils_1.6.jar
org.apache.commons.collections_3.1.jar
org.apache.commons.logging_1.0.4.jar
osdt_cert.jar
osdt_core.jar
share.jar
standard.jar
trinidad-api.jar
trinidad-impl.jar
wls-api.jar
xercesImpl.jar
xmlef.jar
xmlparserv2.jar
4. Finally we need to edit the script to ensure we select a directory which exists to copy the JAR files into.
COPY_DIR=/cygdrive/d/temp/adf11g
export COPY_DIR;
5. Run as follows, ensuring you made it executable using "chmod +x doCopyADF.sh".
./doCopyADF.sh
Note: The list of required JAR files may not be 100% correct but with this script you can simple add/remove files from "adfjars.txt" to ensure you get the correct JAR files you need.
Example output.
papicell@papicell-au ~/d/jdev11g-boxer
$ ./doCopyADF.sh
Copying file adf-controller-api.jar
Copying file adf-controller-rt-common.jar
Copying file adf-controller.jar
Copying file adf-faces-databinding-rt.jar
Copying file adf-pageflow-dtrt.jar
Copying file adf-pageflow-fwk.jar
Copying file adf-pageflow-impl.jar
Copying file adf-pageflow-rc.jar
Copying file adf-richclient-api-11.jar
Copying file adf-richclient-impl-11.jar
Copying file adf-share-base.jar
Copying file adf-share-ca.jar
Copying file adf-share-support.jar
.....
http://blogs.oracle.com/dana/2009/01/how_to_deploy_a_11g_adf_applic_1.html
Here is a small script I wrote which will copy all those JAR files into a TEMP directory to save you time trying to find them one by one. This is a CYGWIN script as I don't know how to write BAT files.
1. Go into your JDeveloper 11g root directory as follows
papicell@papicell-au ~/d/jdev11g-boxer
2. Create a script as follows called "doCopyADF.sh"
#!/bin/sh
COPY_DIR=/cygdrive/d/temp/adf11g
export COPY_DIR;
cat adfjars.txt | while read filename
do
echo "Copying file $filename"
echo ""
find . -name "$filename" -exec cp {} $COPY_DIR \;
done
echo "All files copied.."
3. Now before you run it we need to create a list of ADF 11g JAR files it needs to find in a file called "adfjars.txt".
I simple used VI to create the list of files we need which we retrieved from the blog entry above.
adf-controller-api.jar
adf-controller-rt-common.jar
adf-controller.jar
adf-faces-databinding-rt.jar
adf-pageflow-dtrt.jar
adf-pageflow-fwk.jar
adf-pageflow-impl.jar
adf-pageflow-rc.jar
adf-richclient-api-11.jar
adf-richclient-impl-11.jar
adf-share-base.jar
adf-share-ca.jar
adf-share-support.jar
adflibfilter.jar
adflogginghandler.jar
adfm.jar
adfmweb.jar
cache.jar
commons-el.jar
db-ca.jar
dms.jar
dvt-faces.jar
dvt-jclient.jar
dvt-utils.jar
fmw_audit.jar
identitystore.jar
inspect4.jar
javatools-nodeps.jar
javax.management.j2ee_1.0.jar
jewt4.jar
jmxframework.jar
jmxspi.jar
jps-api.jar
jps-common.jar
jps-ee.jar
jps-internal.jar
jps-unsupported-api.jar
jsf-api.jar
jsf-ri.jar
jstl.jar
mdsrt.jar
ojdbc6.jar
oracle-el.jar
oraclepki.jar
org.apache.commons.beanutils_1.6.jar
org.apache.commons.collections_3.1.jar
org.apache.commons.logging_1.0.4.jar
osdt_cert.jar
osdt_core.jar
share.jar
standard.jar
trinidad-api.jar
trinidad-impl.jar
wls-api.jar
xercesImpl.jar
xmlef.jar
xmlparserv2.jar
4. Finally we need to edit the script to ensure we select a directory which exists to copy the JAR files into.
COPY_DIR=/cygdrive/d/temp/adf11g
export COPY_DIR;
5. Run as follows, ensuring you made it executable using "chmod +x doCopyADF.sh".
./doCopyADF.sh
Note: The list of required JAR files may not be 100% correct but with this script you can simple add/remove files from "adfjars.txt" to ensure you get the correct JAR files you need.
Example output.
papicell@papicell-au ~/d/jdev11g-boxer
$ ./doCopyADF.sh
Copying file adf-controller-api.jar
Copying file adf-controller-rt-common.jar
Copying file adf-controller.jar
Copying file adf-faces-databinding-rt.jar
Copying file adf-pageflow-dtrt.jar
Copying file adf-pageflow-fwk.jar
Copying file adf-pageflow-impl.jar
Copying file adf-pageflow-rc.jar
Copying file adf-richclient-api-11.jar
Copying file adf-richclient-impl-11.jar
Copying file adf-share-base.jar
Copying file adf-share-ca.jar
Copying file adf-share-support.jar
.....
Subscribe to:
Posts (Atom)