Search This Blog

Showing posts with label Tanzu Application Service for Kubernetes. Show all posts

Thursday, 3 September 2020

java-cfenv : A library for accessing Cloud Foundry Services on the new Tanzu Application Service for Kubernetes

The Spring Cloud Connectors library has been with us since the launch event of Cloud Foundry itself back in 2011. This library would create the required Spring Beans from bound VCAP_SERVICE ENV variable from a pushed Cloud Foundry Application such as connecting to databases for example. The java buildpack then replaces these bean definitions you had in your application with those created by the connector library through a feature called ‘auto-reconfiguration’

Auto-reconfiguration is great for getting started. However, it is not so great when you want more control, for example changing the size of the connection pool associated with a DataSource.

With the up coming Tanzu Application Service for Kubernetes the original Cloud Foundry buildpacks are now replaced with the new Tanzu Buildpacks which are based on the Cloud Native Buildpacks CNCF Sandbox project. As a result of this auto-reconfiguration is no longer included in java cloud native buildpacks which means auto-configuration for the backing services is no longer available.

So is their another option for this? The answer is "Java CFEnv". This provide a simple API for retrieving credentials from the JSON strings contained inside the VCAP_SERVICES environment variable.

https://github.com/pivotal-cf/java-cfenv


So if you after exactly how it worked previously all you need to do is add this maven dependancy to your project as shown below.

  
        <dependency>
            <groupId>io.pivotal.cfenv</groupId>
            <artifactId>java-cfenv-boot</artifactId>
        </dependency>

Of course this new library is much more flexible then this and by using the class CfEnv as the entry point to the API for accessing Cloud Foundry environment variables your free to use the Spring Expression Language to invoke methods on the bean of type CfEnv to set properties for example plus more.

For more information read the full blog post as per below

https://spring.io/blog/2019/02/15/introducing-java-cfenv-a-new-library-for-accessing-cloud-foundry-services

Finally this Spring Boot application is an example of using this new library with an application deployed to the new Tanzu Application Service for Kubernetes.

https://github.com/papicella/spring-book-service


More Information

1. Introducing java-cfenv: A new library for accessing Cloud Foundry Services

https://spring.io/blog/2019/02/15/introducing-java-cfenv-a-new-library-for-accessing-cloud-foundry-services

2. Java CFEnv GitHub Repo

https://github.com/pivotal-cf/java-cfenv#pushing-your-application-to-cloud-foundry

Thursday, 6 August 2020

Configure a MySQL Marketplace service for the new Tanzu Application Service on Kubernetes using Container Services Manager for VMware Tanzu

The following post shows how to configure a MySQL service into the new Tanzu Application Service BETA version 0.3.0. For instructions on how to install the Container Services Manager for VMware Tanzu (KSM) see post below.

http://www.clue2solve.io/tanzu/2020/07/14/install-ksm-and-configure-the-cf-marketplace.html

Steps

It's assumed you have already installed KSM into your Kubernetes Cluster as shown below. If not please refer to the documentation to get this done first


$ kubectl get all -n ksm
NAME                                  READY   STATUS    RESTARTS   AGE
pod/ksm-chartmuseum-78d5d5bfb-2ggdg   1/1     Running   0          15d
pod/ksm-ksm-broker-6db696894c-blvpp   1/1     Running   0          15d
pod/ksm-ksm-broker-6db696894c-mnshg   1/1     Running   0          15d
pod/ksm-ksm-daemon-587b6fd549-cc7sv   1/1     Running   1          15d
pod/ksm-ksm-daemon-587b6fd549-fgqx5   1/1     Running   1          15d
pod/ksm-postgresql-0                  1/1     Running   0          15d

NAME                              TYPE           CLUSTER-IP       EXTERNAL-IP     PORT(S)        AGE
service/ksm-chartmuseum           ClusterIP      10.100.200.107   <none>          8080/TCP       15d
service/ksm-ksm-broker            LoadBalancer   10.100.200.229   10.195.93.188   80:30086/TCP   15d
service/ksm-ksm-daemon            LoadBalancer   10.100.200.222   10.195.93.179   80:31410/TCP   15d
service/ksm-postgresql            ClusterIP      10.100.200.213   <none>          5432/TCP       15d
service/ksm-postgresql-headless   ClusterIP      None             <none>          5432/TCP       15d

NAME                              READY   UP-TO-DATE   AVAILABLE   AGE
deployment.apps/ksm-chartmuseum   1/1     1            1           15d
deployment.apps/ksm-ksm-broker    2/2     2            2           15d
deployment.apps/ksm-ksm-daemon    2/2     2            2           15d

NAME                                        DESIRED   CURRENT   READY   AGE
replicaset.apps/ksm-chartmuseum-78d5d5bfb   1         1         1       15d
replicaset.apps/ksm-ksm-broker-6db696894c   2         2         2       15d
replicaset.apps/ksm-ksm-broker-8645dfcf98   0         0         0       15d
replicaset.apps/ksm-ksm-daemon-587b6fd549   2         2         2       15d

NAME                              READY   AGE
statefulset.apps/ksm-postgresql   1/1     15d

1. let's start by getting the Broker IP address which when installed using LoadBalancer type can be retrieved as shown below.

$ kubectl get service ksm-ksm-broker -n ksm -o=jsonpath='{@.status.loadBalancer.ingress[0].ip}'
10.195.93.188

2. Upgrade your Helm release by running the following using the IP address from above

$ export BROKER_IP=$(kubectl get service ksm-ksm-broker -n ksm -o=jsonpath='{@.status.loadBalancer.ingress[0].ip}')
$ helm upgrade ksm ./ksm -n ksm --reuse-values \
            --set cf.brokerUrl="http://$BROKER_IP" \
            --set cf.brokerName=KSM \
            --set cf.apiAddress="https://api.system.run.haas-210.pez.pivotal.io" \
            --set cf.username="admin" \
            --set cf.password="admin-password"

3. Next we configure the ksm CLI. You can download the CLI from here

configure-ksm-cli.sh

export KSM_IP=$(kubectl get service ksm-ksm-daemon -n ksm -o=jsonpath='{@.status.loadBalancer.ingress[0].ip}')
export KSM_TARGET=http://$KSM_IP:$(kubectl get svc ksm-ksm-daemon -n ksm -o=jsonpath='{@.spec.ports[0].port}')
export KSM_USER=admin
export KSM_PASSWORD=$(kubectl get secret -n ksm ksm-ksm-daemon -o=jsonpath='{@.data.SECURITY_USER_PASSWORD}' | base64 --decode)

4. Verify ksm CLI is configured correctly

$ ksm version
Client Version [0.10.80]
Server Version [0.10.80]

5. Create a YAML file for the KSM service account and ClusterRoleBinding using the following YAML:

ksm-sa.yml

---
apiVersion: v1
kind: ServiceAccount
metadata:
  name: ksm-admin
  namespace: kube-system
---
apiVersion: rbac.authorization.k8s.io/v1beta1
kind: ClusterRoleBinding
metadata:
  name: ksm-cluster-admin
roleRef:
  apiGroup: rbac.authorization.k8s.io
  kind: ClusterRole
  name: cluster-admin
subjects:
  - kind: ServiceAccount
    name: ksm-admin
    namespace: kube-system

Apply as follows

$ kubectl apply -f ksm-sa.yml

6. You need a cluster credential file to register and set default Kubernetes clusters that is done as follows

cluster-creds.sh

export kube_config="/Users/papicella/.kube/config"

cluster=`grep current $kube_config|sed "s/ //g"|cut -d ":" -f 2`

echo "Using cluster $cluster"

export server=`grep -B 2 "name: $cluster" $kube_config \
  |grep server|sed "s/ //g"|sed "s/^[^:]*://g"`

export certificate=`grep -B 2 "name: $cluster" $kube_config \
  |grep certificate|sed "s/ //g"|sed "s/.*://"`

export secret_name=$(kubectl get serviceaccount ksm-admin \
   --namespace=kube-system -o jsonpath='{.secrets[0].name}')

export secret_val=$(kubectl --namespace=kube-system get secret $secret_name \
   -o jsonpath='{.data.token}')

export secret_val=$(echo ${secret_val} | base64 --decode)

cat > cluster-creds.yaml << EOF
token: ${secret_val}
server: ${server}
caData: ${certificate}
EOF

echo ""
echo "ready to roll!!!!"
echo ""

Before running this script it's best to make sure you have targeted the correct K8s cluster you wish to. You can run a command as follows to verify that

$ kubectl config current-context
tas4k8s
 
7. Now we have a "cluster-creds.yaml" file we can go ahead and register the Kubernetes cluster with KSM as follows

$ ksm cluster register ksm-svcs ./cluster-creds.yaml
$ ksm cluster set-default ksm-svcs

Verify as follows:

$ ksm cluster list
CLUSTER NAME IP ADDRESS                                      DEFAULT
ksm-svcs    https://tas4k8s.run.haas-210.pez.pivotal.io:8443 true

8. Now we can go ahead and create a Marketplace offering for MySQL. To do that we will use the Bitnami MySQL chart as shown below

$ git clone https://github.com/bitnami/charts.git
$ cd ./charts/bitnami/mysql

** create bind.yaml as follows which is required so our service binding from Tanzu Application Service will inject the right JSON we are expecting or requiring at bind time **

$ cat bind.yaml
template: |
  local filterfunc(j) = std.length(std.findSubstr("mysql", j.name)) > 0;
  local s1 = std.filter(filterfunc, $.services);
  {
    hostname: s1[0].status.loadBalancer.ingress[0].ip,
    name: s1[0].name,
    jdbcUrl: "jdbc:mysql://" + self.hostname + "/my_db?user=" + self.username + "&password=" + self.password + "&useSSL=false",
    uri: "mysql://" + self.username + ":" + self.password + "@" + self.hostname + ":" + self.port + "/my_db?reconnect=true",
    password: $.secrets[0].data['mysql-root-password'],
    port: 3306,
    username: "root"
  }

$ helm package .
# cd ..
$ ksm offer save ./mysql ./mysql/mysql-6.14.7.tgz

Verify MySQL is now part of the offer list as follows
  
$ ksm offer list
MARKETPLACE NAME	INCLUDED CHARTS	VERSION	PLANS
rabbitmq        	rabbitmq       	6.18.1 	[persistent ephemeral]
mysql           	mysql          	6.14.7 	[default]

9. Now we need to login as an ADMIN user

Verify you are logged in as admin user using the CF CLI:

$ cf target
api endpoint:   https://api.system.run.haas-210.pez.pivotal.io
api version:    2.151.0
user:           admin
org:            system
space:          development

10. At this point you can see the KSM service broker registered with TAS4K8s as follows

$ cf service-brokers
Getting service brokers as admin...

name   url
KSM    http://10.195.93.188

11. Enable access to the MySQL service as follows

$ cf enable-service-access mysql

Verify it's enabled:

$ cf service-access
Getting service access as admin...
broker: KSM
   service    plan         access   orgs
   mysql      default      all
   rabbitmq   ephemeral    all
   rabbitmq   persistent   all

12. At this point it's best to log out of admin and log back in as a user that is not admin

$ cf target
api endpoint:   https://api.system.run.haas-210.pez.pivotal.io
api version:    2.151.0
user:           pas
org:            apples-org
space:          development

13. Create a MySQL service as follows. I passing in some JSON to indicate that my K8s cluster support's a LoadBalancer type so use that as part of the creation of the service.

$ cf create-service mysql default pas-mysql -c '{"service":{"type":"LoadBalancer"}}'

14. Check that the service has created correctly it will take a few minutes

$ cf services
Getting services in org apples-org / space development as pas...

name        service    plan        bound apps          last operation     broker   upgrade available
pas-mysql   mysql      default     my-springboot-app   create succeeded   KSM      no

15. Your service is created in it's own K8s namespace BUT that may not be the case at some point. 
$ kubectl get all -n ksm-2e526124-11a3-4d38-966c-b3ffd45471d7
NAME                            READY   STATUS    RESTARTS   AGE
pod/k-wqo5mubw-mysql-master-0   1/1     Running   0          15d
pod/k-wqo5mubw-mysql-slave-0    1/1     Running   0          15d

NAME                             TYPE           CLUSTER-IP       EXTERNAL-IP     PORT(S)          AGE
service/k-wqo5mubw-mysql         LoadBalancer   10.100.200.12    10.195.93.192   3306:30563/TCP   15d
service/k-wqo5mubw-mysql-slave   LoadBalancer   10.100.200.130   10.195.93.191   3306:31982/TCP   15d

NAME                                       READY   AGE
statefulset.apps/k-wqo5mubw-mysql-master   1/1     15d
statefulset.apps/k-wqo5mubw-mysql-slave    1/1     15d

16. At this point we can now test our new MySQL service we created and use a Spring Boot application to test this out with. 

The following GitHub repo can be used for that. Ignore the steps to create a service as you have already done that


Finally to define service plans see the link below

More Information

Container Services Manager(KSM)

Tanzu Application Service for Kubernetes

Thursday, 18 June 2020

GitHub Actions to deploy Spring Boot application to Tanzu Application Service for Kubernetes

In this demo I show how to deploy a simple Spring boot application using GitHub Actions onto Tanzu Application Service for Kubernetes (TAS4K8s).

Steps

Ensure you have Tanzu Application Service for Kubernetes (TAS4K8s) running as shown below.
  
$ kapp list
Target cluster 'https://35.189.13.31' (nodes: gke-tanzu-gke-lab-f67-np-f67b23a0f590-abbca04e-5sqc, 8+)

Apps in namespace 'default'

Name                        Namespaces                                             Lcs    Lca
certmanager-cluster-issuer  (cluster)                                              true   8d
externaldns                 (cluster),external-dns                                 true   8d
harbor-cert                 harbor                                                 true   8d
tas                         (cluster),cf-blobstore,cf-db,cf-system,                false  8d
                            cf-workloads,cf-workloads-staging,istio-system,kpack,
                            metacontroller
tas4k8s-cert                cf-system                                              true   8d

Lcs: Last Change Successful
Lca: Last Change Age

5 apps

Succeeded

The demo exists on GitHub using the following URL, to follow along simply use your own GitHub repository making the changes as detailed below. The example below is for a Spring Boot application so your YAML file for the action would differ for non Java applications but there are many starter templates to choose from for other programming languages.

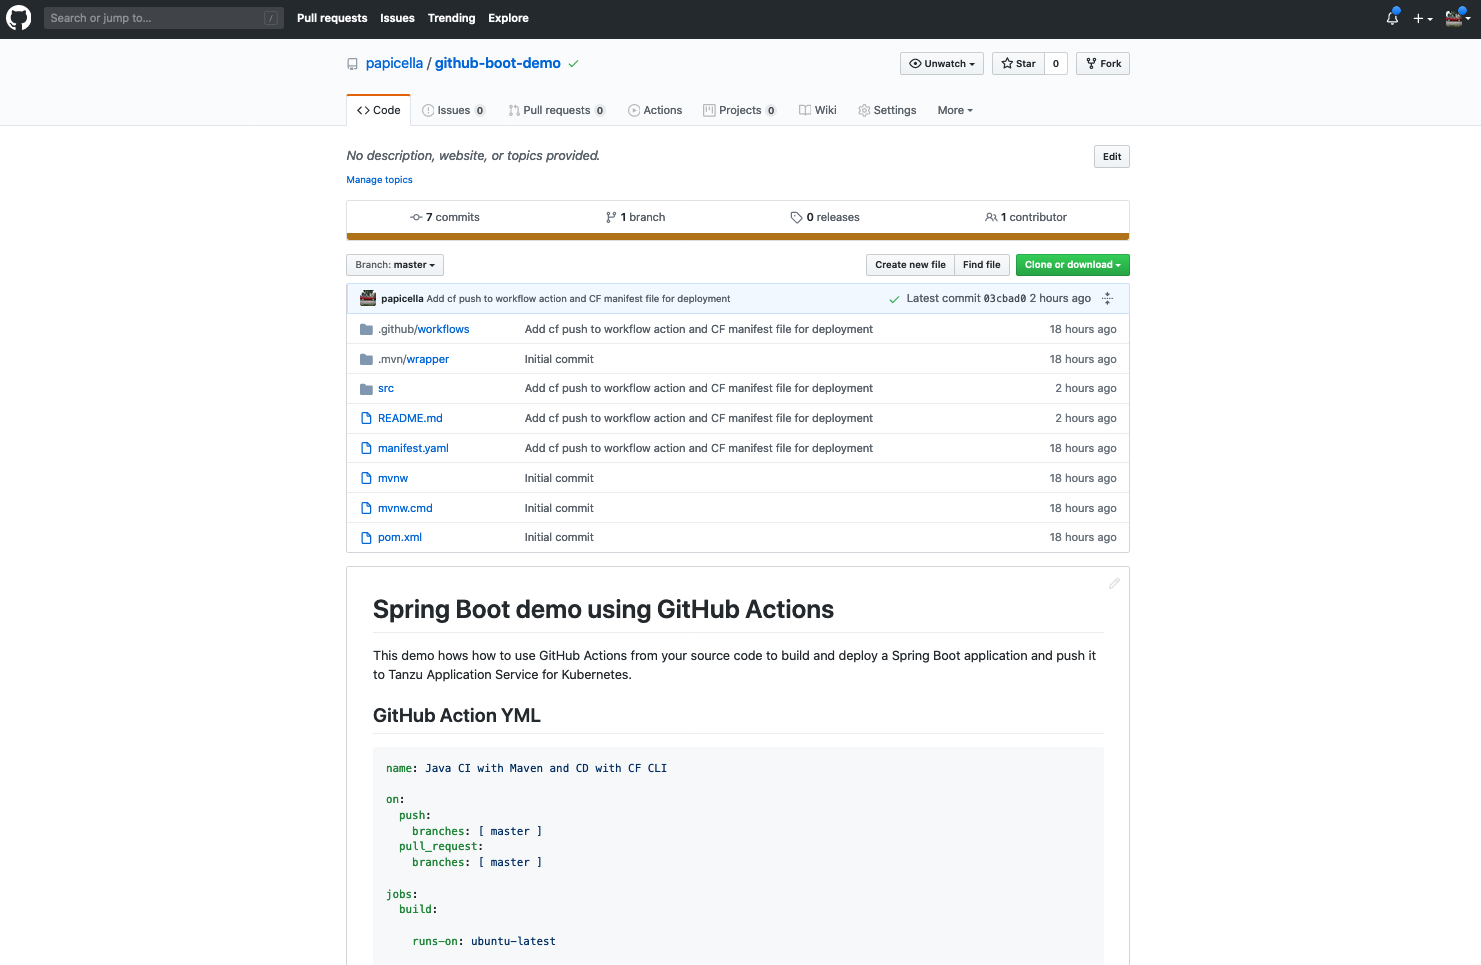
https://github.com/papicella/github-boot-demo


GitHub Actions help you automate your software development workflows in the same place you store code and collaborate on pull requests and issues. You can write individual tasks, called actions, and combine them to create a custom workflow. Workflows are custom automated processes that you can set up in your repository to build, test, package, release, or deploy any code project on GitHub

1. Create a folder at the root of your project source code as follows

$ mkdir ".github/workflows"

2. In ".github/workflows" folder, add a .yml or .yaml file for your workflow. For example, ".github/workflows/maven.yml"

3. Use the "Workflow syntax for GitHub Actions" reference documentation to choose events to trigger an action, add actions, and customize your workflow. In this example the YML "maven.yml" looks as follows.

maven.yml
  
name: Java CI with Maven and CD with CF CLI

on:
  push:
    branches: [ master ]
  pull_request:
    branches: [ master ]

jobs:
  build:

    runs-on: ubuntu-latest

    steps:
    - uses: actions/checkout@v2
    - name: Set up JDK 11.0.5
      uses: actions/setup-java@v1
      with:
        java-version: 11.0.5
    - name: Build with Maven
      run: mvn -B package --file pom.xml
    - name: push to TAS4K8s
      env:
        CF_USERNAME: ${{ secrets.CF_USERNAME }}
        CF_PASSWORD: ${{ secrets.CF_PASSWORD }}
      run: |
        curl --location "https://cli.run.pivotal.io/stable?release=linux64-binary&source=github" | tar zx
        ./cf api https://api.tas.lab.pasapples.me --skip-ssl-validation
        ./cf auth $CF_USERNAME $CF_PASSWORD
        ./cf target -o apples-org -s development
        ./cf push -f manifest.yaml

Few things here around the YML Workflow syntax for the GitHub Action above

  • We are using a maven action sample which will FIRE on a push or pull request on the master branch
  • We are using JDK 11 rather then Java 8
  • 3 Steps exists here
    • Setup JDK
    • Maven Build/Package
    • CF CLI Push to TAS4K8s using the built JAR artifact from the maven build
  • We download the CF CLI into ubuntu image 
  • We have masked the username and password using Secrets

4. Next in the project root add a manifest YAML for deployment to TAS4K8s

- Add a manifest.yaml file in the project root to deploy our simple Spring boot RESTful application

---
applications:
  - name: github-TAS4K8s-boot-demo
    memory: 1024M
    instances: 1
    path: ./target/demo-0.0.1-SNAPSHOT.jar

5. Now we need to add Secrets to the Github repo which are referenced in out "maven.yml" file. In our case they are as follows.
  • CF_USERNAME 
  • CF_PASSWORD
In your GitHub repository click on "Settings" tab then on left hand side navigation bar click on "Secrets" and define your username and password for your TAS4K8s instance as shown below


6. At this point that is all we need to test our GitHub Action. Here in IntelliJ IDEA I issue a commit/push to trigger the GitHub action


7. If all went well using "Actions" tab in your GitHub repo will show you the status and logs as follows


8. Finally our application will be deployed to TAS4K8s as shown below and we can invoke it using HTTPie or CURL for example
  
$ cf apps
Getting apps in org apples-org / space development as pas...
OK

name                       requested state   instances   memory   disk   urls
github-TAS4K8s-boot-demo   started           1/1         1G       1G     github-tas4k8s-boot-demo.apps.tas.lab.pasapples.me
my-springboot-app          started           1/1         1G       1G     my-springboot-app.apps.tas.lab.pasapples.me
test-node-app              started           1/1         1G       1G     test-node-app.apps.tas.lab.pasapples.me

$ cf app github-TAS4K8s-boot-demo
Showing health and status for app github-TAS4K8s-boot-demo in org apples-org / space development as pas...

name:                github-TAS4K8s-boot-demo
requested state:     started
isolation segment:   placeholder
routes:              github-tas4k8s-boot-demo.apps.tas.lab.pasapples.me
last uploaded:       Thu 18 Jun 12:03:19 AEST 2020
stack:
buildpacks:

type:           web
instances:      1/1
memory usage:   1024M
     state     since                  cpu    memory         disk      details
#0   running   2020-06-18T02:03:32Z   0.2%   136.5M of 1G   0 of 1G

$ http http://github-tas4k8s-boot-demo.apps.tas.lab.pasapples.me
HTTP/1.1 200 OK
content-length: 28
content-type: text/plain;charset=UTF-8
date: Thu, 18 Jun 2020 02:07:39 GMT
server: istio-envoy
x-envoy-upstream-service-time: 141

Thu Jun 18 02:07:39 GMT 2020


More Information

Download TAS4K8s
https://network.pivotal.io/products/tas-for-kubernetes/

GitHub Actions
https://github.com/features/actions

GitHub Marketplace - Actions
https://github.com/marketplace?type=actions