Taking VMware Tanzu Mission Control for a test drive
http://theblasfrompas.blogspot.com/2020/02/taking-tanzu-mission-control-for-test.html
In this example we will use the "Create Cluster" button to create a new k8s cluster on AWS that will be managed by TMC for it's entire lifecycle.
Steps
Note: Before getting started you need to create a "Cloud Provider Account" and that is done using AWS as shown below. You can create one or more connected cloud provider accounts. Adding accounts allows you to start using VMware TMC to create clusters, add data protection, and much more
1. Click on the "Clusters" on the left hand navigation bar
2. In the right hand corner click the button "New Cluster" and select your cloud provider account on AWS as shown below
3. Fill in the details of your new cluster as shown below ensuring you select the correct AWS region where your cluster will be created.
4. Click Next
5. In the next screen I am just going to select a Development control plane
6. Click Next
7. Edit the default-node-pool and add 2 worker nodes instead of just 1 as shown below
8. Click "Create"
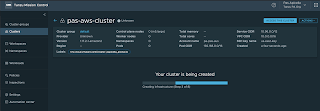
9. This will take you to a screen where your cluster will create. This can take at least 20 minutes so be patient. Progress is shown as per below
10. If we switch over to AWS console we will start to see some running instances and other cloud components being created as shown in the images below
11. Eventually the cluster will create and you are taken to a summary screen for your cluster. It will take a few minutes for all "Agent and extensions health" to show up green so refresh the page serval times until all shows up green as per below.
Note: This can take up to 10 minutes so be patient
12. So to access this cluster using "kubectl" use the button "Access this Cluster" in the top right hand corner and it will take you to a screen as follows. Click the "Download kubeconfig file" and the "Tanzu Mission Control CLI" as you will need both those files and save them locally
13. make the "tmc" CLI executable and save to your $PATH as shown below
$ chmod +x tmc
$ sudo mv tmc /usr/local/bin
14. Access cluster using "kubectl" as follows
  $ kubectl --kubeconfig=./kubeconfig-pas-aws-cluster.yml get namespaces
  NAME                STATUS   AGE
  default             Active   19m
  kube-node-lease     Active   19m
  kube-public         Active   19m
  kube-system         Active   19m
  vmware-system-tmc   Active   17m
Note: You will be taken to a web page to authenticate and once that's done your good to go as shown below
15. You can view the pods created to allows access from the TMC agent as follows
$ kubectl --kubeconfig=./kubeconfig-pas-aws-cluster.yml get pods --namespace=vmware-system-tmc
NAME                                     READY   STATUS      RESTARTS   AGE
agent-updater-7b47c659d-8h2mh            1/1     Running     0          25m
agentupdater-workload-1581415620-csz5p   0/1     Completed   0          35s
data-protection-769994df65-6cgfh         1/1     Running     0          24m
extension-manager-657b467c-k4fkl         1/1     Running     0          25m
extension-updater-c76785dc9-vnmdl        1/1     Running     0          25m
inspection-extension-79dcff47f6-7lm5r    1/1     Running     0          24m
intent-agent-7bdf6c8bd4-kgm46            1/1     Running     0          24m
policy-sync-extension-8648685fc7-shn5g   1/1     Running     0          24m
policy-webhook-78f5699b76-bvz5f          1/1     Running     1          24m
policy-webhook-78f5699b76-td74b          1/1     Running     0          24m
sync-agent-84f5f8bcdc-mrc9p              1/1     Running     0          24m
So if you got this far you now have attached a cluster and created a cluster from scratch all from VMware TMC and that's just the start.
Soon I will show to add some policies to our cluster now we have them under management
More Information
Introducing VMware Tanzu Mission Control to Bring Order to Cluster Chaos
https://blogs.vmware.com/cloudnative/2019/08/26/vmware-tanzu-mission-control/
VMware Tanzu Mission Control
https://cloud.vmware.com/tanzu-mission-control


No comments:
Post a Comment