I was recently asked how to determine how many application instances exist in a given ORG at a point in time. The script below can do this using CF CURL command which means you must be logged into your Pivotal Cloud Foundry instance for this to work. You can use the CF REST API itself but I find the CF CURL much easier.
CF REST API https://apidocs.cloudfoundry.org/249/
The script below is assuming an ORG name of "apples-pivotal-org" so it would make sense to pass this in as a script variable which is easy enough to do
Prior to running this script it's worth checking your current TARGET endpoints as shown below.
pasapicella@pas-macbook:~/pivotal/PCF/scripts$ cf target
API endpoint: https://api.run.pivotal.io (API version: 2.65.0)
User: papicella@pivotal.io
Org: apples-pivotal-org
Space: development
Script:
echo "AI Count for applications in a organization.."
echo ""
guids=$(cf curl /v2/apps?q=organization_guid:`cf org apples-pivotal-org --guid` | jq -r ".resources[].metadata.guid")
total=0
for guid in $guids; do
name=$(cf curl /v2/apps/$guid | jq -r ".entity.name")
count=$(cf curl /v2/apps/$guid | jq -r ".entity.instances")
echo -e "App Name: $name , Instances: $count"
total=$(( $total + $count ))
done
echo "-----"
echo "Total AI's = $total"
echo ""
Output:
pasapicella@pas-macbook:~/pivotal/PCF/scripts$ ./ai-count-org-details.sh
AI Count for applications in a organization..
App Name: pas-telstrawifiapi-client , Instances: 1
App Name: springboot-bootstrap-employee , Instances: 2
App Name: springboot-employee-feign-client , Instances: 1
App Name: greeting-config , Instances: 1
App Name: employee-feign-client-hystrix , Instances: 1
App Name: pas-albums , Instances: 2
App Name: pas-springboot-pcf , Instances: 2
App Name: springboot-typeahead , Instances: 1
-----
Total AI's = 11
Tuesday, 20 December 2016
Wednesday, 14 December 2016
Spring Boot with Feign and Twitter Typeahead JS library
I previously blogged about a demo using Spring Boot and Feign making an external based REST call to a service I had created. The real purpose of that demo "http://theblasfrompas.blogspot.com.au/2016/12/spring-boot-feign-client-accessing.html" was to use Twitter Typeahead for auto completion which is the demo on Github below. The returned data is now used in an INPUT text input for auto completion as the user types in the Country Name
https://github.com/papicella/FeignClientExternalSpringBoot

https://github.com/papicella/FeignClientExternalSpringBoot

Friday, 9 December 2016
Spring Boot / Feign Client accessing external service
Previously we used Feign to create clients for our own services, which are registered on our Eureka Server using a service name as shown in the previous blog post http://theblasfrompas.blogspot.com.au/2016/11/declarative-rest-client-feign-with_8.html. It's not unusual that you'd want to implement an external rest endpoint, basically an endpoint that's not discoverable by Eureka. In that case, you can use the url property on the @FeignClient annotation,
which gracefully supports property injection. His an example of this.
Full example on GitHub as follows
https://github.com/papicella/FeignClientExternalSpringBoot
1. Start by adding the correct maven dependencies and the one you need is as follows, there would be others if you want to use a web based spring boot project etc.
2. We are going to consume this external service as follows
http://country.io/names.json
To do that we create a simple interface as follows
3. In this example I have created a RestController to consume this REST service and test it because it's the easiest way to do this. We simply AutoWire the CountryServiceClient interface into the RestController to make those external calls through FEIGN.
4. Of course we will have our main class to boot strap the application and it includes the "spring-boot-starter-web" maven repo to start a tomcat server for us.
5. Ensure your application.properties or application.yml has the following properties to disable timeouts.
feign:
hystrix:
enabled: false
hystrix:
command:
choose:
default:
execution:
timeout:
enabled: false
6. Run the main class "FeignClientExternalSpringBootApplication"
Access as follows
http://localhost:8080/countries

which gracefully supports property injection. His an example of this.
Full example on GitHub as follows
https://github.com/papicella/FeignClientExternalSpringBoot
1. Start by adding the correct maven dependencies and the one you need is as follows, there would be others if you want to use a web based spring boot project etc.
<dependency>
  <groupId>org.springframework.cloud</groupId>
  <artifactId>spring-cloud-starter-feign</artifactId>
</dependency>
2. We are going to consume this external service as follows
http://country.io/names.json
To do that we create a simple interface as follows
package pas.au.pivotal.feign.external;

import org.springframework.cloud.netflix.feign.FeignClient;
import org.springframework.web.bind.annotation.RequestMapping;
import org.springframework.web.bind.annotation.RequestMethod;

@FeignClient(name = "country-service-client", url = "http://country.io")
public interface CountryServiceClient {

    @RequestMapping(method = RequestMethod.GET, value = "/names.json")
    String getCountries();
}
3. In this example I have created a RestController to consume this REST service and test it because it's the easiest way to do this. We simply AutoWire the CountryServiceClient interface into the RestController to make those external calls through FEIGN.
package pas.au.pivotal.feign.external.controller;

import org.slf4j.Logger;
import org.slf4j.LoggerFactory;
import org.springframework.beans.factory.annotation.Autowired;
import org.springframework.boot.json.JsonParser;
import org.springframework.boot.json.JsonParserFactory;
import org.springframework.web.bind.annotation.RequestMapping;
import org.springframework.web.bind.annotation.RequestMethod;
import org.springframework.web.bind.annotation.RestController;
import pas.au.pivotal.feign.external.CountryServiceClient;

import java.util.Map;

@RestController
public class CountryRest
{
    Logger logger = LoggerFactory.getLogger(CountryRest.class);
    private static final JsonParser parser = JsonParserFactory.getJsonParser();

    @Autowired
    private CountryServiceClient countryServiceClient;

    @RequestMapping(value = "/countries", method = RequestMethod.GET,
                         produces = "application/json")
    public String allCountries()
    {
        String countries = countryServiceClient.getCountries();

        return countries;
    }

    @RequestMapping(value = "/country_names", method = RequestMethod.GET)
    public String[] countryNames ()
    {
        String countries = countryServiceClient.getCountries();

        Map<String, Object> countryMap = parser.parseMap(countries);

        String countryArray[] = new String[countryMap.size()];
        logger.info("Size of countries " + countryArray.length);

        int i = 0;
        for (Map.Entry<String, Object> entry : countryMap.entrySet()) {
            countryArray[i] = (String) entry.getValue();
            i++;
        }

        return countryArray;

    }
}
4. Of course we will have our main class to boot strap the application and it includes the "spring-boot-starter-web" maven repo to start a tomcat server for us.
package pas.au.pivotal.feign.external;

import org.springframework.boot.SpringApplication;
import org.springframework.boot.autoconfigure.SpringBootApplication;
import org.springframework.cloud.netflix.feign.EnableFeignClients;

@SpringBootApplication
@EnableFeignClients
public class FeignClientExternalSpringBootApplication {

 public static void main(String[] args) {
  SpringApplication.run(FeignClientExternalSpringBootApplication.class, args);
 }
}
5. Ensure your application.properties or application.yml has the following properties to disable timeouts.
feign:
hystrix:
enabled: false
hystrix:
command:
choose:
default:
execution:
timeout:
enabled: false
6. Run the main class "FeignClientExternalSpringBootApplication"
Access as follows
http://localhost:8080/countries

Tuesday, 22 November 2016
Deploying Spring Boot Applications on Google Application Engine (GAE)
I previously blogged about how to how to deploy a Spring Boot application to Flexible VM's on Google Cloud Platform as shown below.
http://theblasfrompas.blogspot.com.au/2016/09/spring-boot-on-google-cloud-platform-gcp.html
In this example below I use Google Application Engine (GAE) to deploy a Spring Boot application without using a flexible VM which is a lot faster and what I orginally wanted to do when I did this previously. In short this is using the [Standard environment] option for GAE.
Spring Boot uses Servlet 3.0 APIs to initialize the ServletContext (register Servlets etc.) so you can’t use the same application out of the box in a Servlet 2.5 container. It is however possible to run a Spring Boot application on an older container with some special tools. If you include org.springframework.boot:spring-boot-legacy as a dependency (maintained separately to the core of Spring Boot and currently available at 1.0.2.RELEASE), all you should need to do is create a web.xml and declare a context listener to create the application context and your filters and servlets. The context listener is a special purpose one for Spring Boot, but the rest of it is normal for a Spring application in Servlet 2.5
Visit for more Information:
http://docs.spring.io/spring-boot/docs/current/reference/htmlsingle/#howto-servlet-2-5
Steps
1. In order to use Servlet 2.5 and a web.xml we will need to add spring-boot-legacy dependecany to a local maven repoistory as shown below.
$ git clone https://github.com/scratches/spring-boot-legacy
$ cd spring-boot-legacy
$ mvn install
2. Clone and package the GIT REPO as shown below
$ https://github.com/papicella/GoogleAppEngineSpringBoot.git
3. Edit the file ./src/main/webapp/WEB-INF/appengine-web.xml to specify the correct APPLICATION ID which we will target in step 4 as well.
4. Package as shown below
$ mvn package
5. Target your project for deployment as follows
pasapicella@pas-macbook:~/piv-projects/GoogleAppEngineSpringBoot$ gcloud projects list
PROJECT_ID NAME PROJECT_NUMBER
bionic-vertex-150302 AppEngineSpringBoot 97889500330
fe-papicella FE-papicella 1049163203721
pas-spring-boot-on-gcp Pas Spring Boot on GCP 1043917887789
pasapicella@pas-macbook:~/piv-projects/GoogleAppEngineSpringBoot$ gcloud config set project fe-papicella
Updated property [core/project].
6. Deploy as follows
mvn appengine:deploy
Finally once deployed you can access you application using it's endpoint which is displayed in the dashboard of GCP console


Project in InteiilJ IDEA

NOTE: Google AppEngine does not allow JMX, so you have to switch it off in a Spring Boot app (set spring.jmx.enabled=false in application.properties).
application.properties
spring.jmx.enabled=false
More Information
Full working example with code as follows on GitHub
https://github.com/papicella/GoogleAppEngineSpringBoot
http://theblasfrompas.blogspot.com.au/2016/09/spring-boot-on-google-cloud-platform-gcp.html
In this example below I use Google Application Engine (GAE) to deploy a Spring Boot application without using a flexible VM which is a lot faster and what I orginally wanted to do when I did this previously. In short this is using the [Standard environment] option for GAE.
Spring Boot uses Servlet 3.0 APIs to initialize the ServletContext (register Servlets etc.) so you can’t use the same application out of the box in a Servlet 2.5 container. It is however possible to run a Spring Boot application on an older container with some special tools. If you include org.springframework.boot:spring-boot-legacy as a dependency (maintained separately to the core of Spring Boot and currently available at 1.0.2.RELEASE), all you should need to do is create a web.xml and declare a context listener to create the application context and your filters and servlets. The context listener is a special purpose one for Spring Boot, but the rest of it is normal for a Spring application in Servlet 2.5
Visit for more Information:
http://docs.spring.io/spring-boot/docs/current/reference/htmlsingle/#howto-servlet-2-5
Steps
1. In order to use Servlet 2.5 and a web.xml we will need to add spring-boot-legacy dependecany to a local maven repoistory as shown below.
$ git clone https://github.com/scratches/spring-boot-legacy
$ cd spring-boot-legacy
$ mvn install
2. Clone and package the GIT REPO as shown below
$ https://github.com/papicella/GoogleAppEngineSpringBoot.git
3. Edit the file ./src/main/webapp/WEB-INF/appengine-web.xml to specify the correct APPLICATION ID which we will target in step 4 as well.
<?xml version="1.0" encoding="utf-8"?>
<appengine-web-app xmlns="http://appengine.google.com/ns/1.0">
 <application>fe-papicella</application>
 <version>5</version>
   <threadsafe>true</threadsafe>
 <manual-scaling>
  <instances>1</instances>
 </manual-scaling>
</appengine-web-app>
4. Package as shown below
$ mvn package
5. Target your project for deployment as follows
pasapicella@pas-macbook:~/piv-projects/GoogleAppEngineSpringBoot$ gcloud projects list
PROJECT_ID NAME PROJECT_NUMBER
bionic-vertex-150302 AppEngineSpringBoot 97889500330
fe-papicella FE-papicella 1049163203721
pas-spring-boot-on-gcp Pas Spring Boot on GCP 1043917887789
pasapicella@pas-macbook:~/piv-projects/GoogleAppEngineSpringBoot$ gcloud config set project fe-papicella
Updated property [core/project].
6. Deploy as follows
mvn appengine:deploy
Finally once deployed you can access you application using it's endpoint which is displayed in the dashboard of GCP console


Project in InteiilJ IDEA

NOTE: Google AppEngine does not allow JMX, so you have to switch it off in a Spring Boot app (set spring.jmx.enabled=false in application.properties).
application.properties
spring.jmx.enabled=false
More Information
Full working example with code as follows on GitHub
https://github.com/papicella/GoogleAppEngineSpringBoot
Friday, 18 November 2016
Uploading Tiles into Pivotal Cloud Foundry Operations Manager from the Ops Manager VM directly
When deploying PCF, you start by deploying Ops Manager. This is basically a VM that you deploy into your IaaS system of choice and it orchestrates the PCF installation. The installation of PCF is done by you through a web interface that runs on the Ops Manager VM. Into that web interface, you can load various "tiles". Each tile provides a specific set of functionality.
For example, Ops Manager comes with a tile for Bosh Director. This is the only out-of-the-box tile, as all the other tiles depend on it. Most users will first install the PCF tile. This provides the Cloud Foundry installation. After that, tiles generally provide functionality for services. Popular tiles include MySQL, RabbitMQ and Redis. There are quite a few tiles in total now, you can see them all listed on https://network.pivotal.io.

Some tiles are quite large , for example the "Elastic Runtime" tile in PCF 1.8 is 5G so from Australia I don't want to a 5G file to my laptop then upload it into the Ops Manager Web UI so here is how you can import tiles directly from the Ops Manager VM itself
1. Log into the Ops Manager VM using SSH with your keyfile.
Note: 0.0.0.0 is a bogus ip address for obvious reasons
pasapicella@pas-macbook:~/pivotal/GCP/install/ops-manager-key$ ssh -i ubuntu-key ubuntu@0.0.0.0
Welcome to Ubuntu 14.04.5 LTS (GNU/Linux 4.4.0-47-generic x86_64)
* Documentation: https://help.ubuntu.com/
System information as of Wed Nov 16 23:36:27 UTC 2016
System load: 0.0 Processes: 119
Usage of /: 36.4% of 49.18GB Users logged in: 0
Memory usage: 37% IP address for eth0: 10.0.0.0
Swap usage: 0%
Graph this data and manage this system at:
https://landscape.canonical.com/
Get cloud support with Ubuntu Advantage Cloud Guest:
http://www.ubuntu.com/business/services/cloud
Your Hardware Enablement Stack (HWE) is supported until April 2019.
Last login: Wed Nov 16 23:36:30 2016 from 0.0.0.0
ubuntu@myvm-gcp:~$
2. Log into https://network.pivotal.io/ and click on "Edit Profile" as shown below

3. Locate your "API token" and record it we will need it shortly
4. In this example I am uploading the "Pivotal Cloud Foundry Elastic Runtime" tile so navigate to the correct file and select the "i" icon to reveal the API endpoint for the tile.

5. Issue a wget command as follows which has a format as follows. This will download the 5G file into the HOME directory. Wait for this to complete before moving to the next step.
wget {file-name} --post-data="" --header="Authorization: Token {TOKEN-FROM-STEP-3" {API-LOCATION-URL}
$ wget -O cf-1.8.14-build.7.pivotal --post-data="" --header="Authorization: Token {TOKEN-FROM-STEP-3" https://network.pivotal.io/api/v2/products/elastic-runtime/releases/2857/product_files/9161/download
6. Retrieve an access token which will need us to use the username/password for the Ops Manager admin account.
curl -s -k -H 'Accept: application/json;charset=utf-8' -d 'grant_type=password' -d 'username=admin' -d 'password=OPSMANAGER-ADMIN-PASSWD' -u 'opsman:' https://localhost/uaa/oauth/token
$ curl -s -k -H 'Accept: application/json;charset=utf-8' -d 'grant_type=password' -d 'username=admin' -d 'password=welcome1' -u 'opsman:' https://localhost/uaa/oauth/token
{"access_token":"eyJhbGciOiJSUzI1NiIsImtpZCI6ImxlZ2Fj ...... "
7. Finally upload the tile to be imported from the Ops Manager UI using a format as follows. You need to make sure you use the correct file name as per the download from STEP 5
curl -v -H "Authorization: Bearer STEP6-ACCESS-TOKEN" 'https://localhost/api/products' -F 'product[file]=@/home/ubuntu/cf-1.8.14-build.7.pivotal' -X POST -k
Once complete you should see the Tile in Ops Manager as shown below. This is much faster way to upload tiles especially from Australia

More Information
https://docs.pivotal.io/pivotalcf/1-8/customizing/pcf-interface.html
For example, Ops Manager comes with a tile for Bosh Director. This is the only out-of-the-box tile, as all the other tiles depend on it. Most users will first install the PCF tile. This provides the Cloud Foundry installation. After that, tiles generally provide functionality for services. Popular tiles include MySQL, RabbitMQ and Redis. There are quite a few tiles in total now, you can see them all listed on https://network.pivotal.io.

Some tiles are quite large , for example the "Elastic Runtime" tile in PCF 1.8 is 5G so from Australia I don't want to a 5G file to my laptop then upload it into the Ops Manager Web UI so here is how you can import tiles directly from the Ops Manager VM itself
1. Log into the Ops Manager VM using SSH with your keyfile.
Note: 0.0.0.0 is a bogus ip address for obvious reasons
pasapicella@pas-macbook:~/pivotal/GCP/install/ops-manager-key$ ssh -i ubuntu-key ubuntu@0.0.0.0
Welcome to Ubuntu 14.04.5 LTS (GNU/Linux 4.4.0-47-generic x86_64)
* Documentation: https://help.ubuntu.com/
System information as of Wed Nov 16 23:36:27 UTC 2016
System load: 0.0 Processes: 119
Usage of /: 36.4% of 49.18GB Users logged in: 0
Memory usage: 37% IP address for eth0: 10.0.0.0
Swap usage: 0%
Graph this data and manage this system at:
https://landscape.canonical.com/
Get cloud support with Ubuntu Advantage Cloud Guest:
http://www.ubuntu.com/business/services/cloud
Your Hardware Enablement Stack (HWE) is supported until April 2019.
Last login: Wed Nov 16 23:36:30 2016 from 0.0.0.0
ubuntu@myvm-gcp:~$
2. Log into https://network.pivotal.io/ and click on "Edit Profile" as shown below

3. Locate your "API token" and record it we will need it shortly
4. In this example I am uploading the "Pivotal Cloud Foundry Elastic Runtime" tile so navigate to the correct file and select the "i" icon to reveal the API endpoint for the tile.

5. Issue a wget command as follows which has a format as follows. This will download the 5G file into the HOME directory. Wait for this to complete before moving to the next step.
wget {file-name} --post-data="" --header="Authorization: Token {TOKEN-FROM-STEP-3" {API-LOCATION-URL}
$ wget -O cf-1.8.14-build.7.pivotal --post-data="" --header="Authorization: Token {TOKEN-FROM-STEP-3" https://network.pivotal.io/api/v2/products/elastic-runtime/releases/2857/product_files/9161/download
curl -s -k -H 'Accept: application/json;charset=utf-8' -d 'grant_type=password' -d 'username=admin' -d 'password=OPSMANAGER-ADMIN-PASSWD' -u 'opsman:' https://localhost/uaa/oauth/token
$ curl -s -k -H 'Accept: application/json;charset=utf-8' -d 'grant_type=password' -d 'username=admin' -d 'password=welcome1' -u 'opsman:' https://localhost/uaa/oauth/token
{"access_token":"eyJhbGciOiJSUzI1NiIsImtpZCI6ImxlZ2Fj ...... "
7. Finally upload the tile to be imported from the Ops Manager UI using a format as follows. You need to make sure you use the correct file name as per the download from STEP 5
curl -v -H "Authorization: Bearer STEP6-ACCESS-TOKEN" 'https://localhost/api/products' -F 'product[file]=@/home/ubuntu/cf-1.8.14-build.7.pivotal' -X POST -k
Once complete you should see the Tile in Ops Manager as shown below. This is much faster way to upload tiles especially from Australia

More Information
https://docs.pivotal.io/pivotalcf/1-8/customizing/pcf-interface.html
Thursday, 17 November 2016
Installing Pivotal Cloud Foundry (PCF) on Google Cloud Platform (GCP)
I decided to install PCF 1.8 onto Google Cloud Platform today and I thought the experience was fantastic and very straight forward. The GCP Console is fantastic and very powerful indeed. The steps to install it are as follows
http://docs.pivotal.io/pivotalcf/1-8/customizing/gcp.html
Here are some screen shots you would expect to see along the way when using Operations Manager
Screen Shots


Finally Once Installed here is how to create an ORG, USER and get started using the CLI. You will note you must log in as ADMIN to get started and finally I log in as the user who will be the OrgManager.
** Target my PCF Instance **
pasapicella@pas-macbook:~/pivotal/GCP/install$ cf api https://api.system.pas-apples.online --skip-ssl-validation
Setting api endpoint to https://api.system.pas-apples.online...
OK
API endpoint: https://api.system.pas-apples.online (API version: 2.58.0)
Not logged in. Use 'cf login' to log in.
** Login as ADMIN **
pasapicella@pas-macbook:~/pivotal/GCP/install$ cf login -u admin -p YYYY -o system -s system
API endpoint: https://api.system.pas-apples.online
Authenticating...
OK
Targeted org system
Targeted space system
API endpoint: https://api.system.pas-apples.online (API version: 2.58.0)
User: admin
Org: system
Space: system
** Create Org **
pasapicella@pas-macbook:~/pivotal/GCP/install$ cf create-org gcp-pcf-org
Creating org gcp-pcf-org as admin...
OK
Assigning role OrgManager to user admin in org gcp-pcf-org ...
OK
TIP: Use 'cf target -o gcp-pcf-org' to target new org
** Create a USER **
pasapicella@pas-macbook:~/pivotal/GCP/install$ cf create-user pas YYYY
Creating user pas...
OK
TIP: Assign roles with 'cf set-org-role' and 'cf set-space-role'
** Set ORG Role **
pasapicella@pas-macbook:~/pivotal/GCP/install$ cf set-org-role pas gcp-pcf-org OrgManager
Assigning role OrgManager to user pas in org gcp-pcf-org as admin...
OK
** Target the newly created ORG **
pasapicella@pas-macbook:~/pivotal/GCP/install$ cf target -o gcp-pcf-org
API endpoint: https://api.system.pas-apples.online (API version: 2.58.0)
User: admin
Org: gcp-pcf-org
Space: No space targeted, use 'cf target -s SPACE'
** Create a SPACE **
pasapicella@pas-macbook:~/pivotal/GCP/install$ cf create-space development
Creating space development in org gcp-pcf-org as admin...
OK
Assigning role RoleSpaceManager to user admin in org gcp-pcf-org / space development as admin...
OK
Assigning role RoleSpaceDeveloper to user admin in org gcp-pcf-org / space development as admin...
OK
TIP: Use 'cf target -o "gcp-pcf-org" -s "development"' to target new space
** Set Some Space Roles **
pasapicella@pas-macbook:~/pivotal/GCP/install$ cf set-space-role pas gcp-pcf-org development SpaceDeveloper
Assigning role RoleSpaceDeveloper to user pas in org gcp-pcf-org / space development as admin...
OK
pasapicella@pas-macbook:~/pivotal/GCP/install$ cf set-space-role pas gcp-pcf-org development SpaceManager
Assigning role RoleSpaceManager to user pas in org gcp-pcf-org / space development as admin...
OK
** Login as PAS user and target the correct ORG/SPACE **
pasapicella@pas-macbook:~/pivotal/GCP/install$ cf login -u pas -p YYYY -o gcp-pcf-org -s development
API endpoint: https://api.system.pas-apples.online
Authenticating...
OK
Targeted org gcp-pcf-org
Targeted space development
API endpoint: https://api.system.pas-apples.online (API version: 2.58.0)
User: pas
Org: gcp-pcf-org
Space: development
Lets push a simple application
Application manifest.yml
pasapicella@pas-macbook:~/piv-projects/PivotalSpringBootJPA$ cat manifest-inmemory-db.yml
applications:
- name: pas-albums
memory: 512M
instances: 1
random-route: true
path: ./target/PivotalSpringBootJPA-0.0.1-SNAPSHOT.jar
env:
JAVA_OPTS: -Djava.security.egd=file:///dev/urando
Deploy
pasapicella@pas-macbook:~/piv-projects/PivotalSpringBootJPA$ cf push -f manifest-inmemory-db.yml
Using manifest file manifest-inmemory-db.yml
Creating app pas-albums in org gcp-pcf-org / space development as pas...
OK
Creating route pas-albums-gloomful-synapse.apps.pas-apples.online...
OK
Binding pas-albums-gloomful-synapse.apps.pas-apples.online to pas-albums...
OK
Uploading pas-albums...
Uploading app files from: /var/folders/c3/27vscm613fjb6g8f5jmc2x_w0000gp/T/unzipped-app341113312
Uploading 31.6M, 195 files
Done uploading
OK
Starting app pas-albums in org gcp-pcf-org / space development as pas...
0 of 1 instances running, 1 starting
0 of 1 instances running, 1 starting
0 of 1 instances running, 1 starting
1 of 1 instances running
App started
OK
App pas-albums was started using this command `CALCULATED_MEMORY=$($PWD/.java-buildpack/open_jdk_jre/bin/java-buildpack-memory-calculator-2.0.2_RELEASE -memorySizes=metaspace:64m..,stack:228k.. -memoryWeights=heap:65,metaspace:10,native:15,stack:10 -memoryInitials=heap:100%,metaspace:100% -stackThreads=300 -totMemory=$MEMORY_LIMIT) && JAVA_OPTS="-Djava.io.tmpdir=$TMPDIR -XX:OnOutOfMemoryError=$PWD/.java-buildpack/open_jdk_jre/bin/killjava.sh $CALCULATED_MEMORY -Djava.security.egd=file:///dev/urando" && SERVER_PORT=$PORT eval exec $PWD/.java-buildpack/open_jdk_jre/bin/java $JAVA_OPTS -cp $PWD/. org.springframework.boot.loader.JarLauncher`
Showing health and status for app pas-albums in org gcp-pcf-org / space development as pas...
OK
requested state: started
instances: 1/1
usage: 512M x 1 instances
urls: pas-albums-gloomful-synapse.apps.pas-apples.online
last uploaded: Thu Nov 17 03:39:04 UTC 2016
stack: cflinuxfs2
buildpack: java-buildpack=v3.8.1-offline-https://github.com/cloudfoundry/java-buildpack.git#29c79f2 java-main java-opts open-jdk-like-jre=1.8.0_91-unlimited-crypto open-jdk-like-memory-calculator=2.0.2_RELEASE spring-auto-reconfiguration=1.10.0_RELEASE
state since cpu memory disk details
#0 running 2016-11-17 02:39:57 PM 142.6% 333.1M of 512M 161M of 1G
Get Route to Application
pasapicella@pas-macbook:~/piv-projects/PivotalSpringBootJPA$ cf apps
Getting apps in org gcp-pcf-org / space development as pas...
OK
name requested state instances memory disk urls
pas-albums started 1/1 512M 1G pas-albums-gloomful-synapse.apps.pas-apples.online


More Information
https://cloud.google.com/solutions/cloud-foundry-on-gcp
Tuesday, 15 November 2016
Accessing the Cloud Foundry REST API from SpringBoot
Accessing the Cloud Foundry REST API is simple enough to do as shown in the example below using curl we can list all our organizations.
Cloud Foundry REST API - https://apidocs.cloudfoundry.org/246/
Below shows just the organizations name and I am filtering on that using JQ, if you wnat to see all the output then remove the PIPE or JQ. You have to be logged in to use "cf oauth-token"
pasapicella@pas-macbook:~/apps$ curl -k "https://api.run.pivotal.io/v2/organizations" -X GET -H "Authorization: `cf oauth-token`" | jq -r ".resources[].entity.name"
APJ
apples-pivotal-org
Suncorp
In the example below I will show how you would invoke this REST API using SpringBoot's RestTemplate.
1. Firstly we need to retrieve our bearer token as we will need that for all API calls into the CF REST API. The code below will retrieve that for us using the RestTemplate
To achieve the same thing as above using CURL would look as follows, I have stripped the actual bearer token as that is a lot of TEXT.
pasapicella@pas-macbook:~$ curl -v -XPOST -H "Application/json" -u "cf:" --data "username=papicella@pivotal.io&password=PASSWORD&client_id=cf&grant_type=password&response_type=token" https://login.run.pivotal.io/oauth/token
...
{"access_token":"YYYYYYYYYYY ....","token_type":"bearer","refresh_token":"3dd9a2b63f3640c38eb8220e2ae88dfc-r","expires_in":599,"scope":"openid uaa.user cloud_controller.read password.write cloud_controller.write","jti":"c3706c86e376445686a0dd289262bbfa"}
2. Once we have the bearer token we can then make calls to the CF REST API using the bearer token as shown below. The code below simply ensures we get the bearer token before we make the calls to the CF REST API and then we are free to output what we want to output. One method below simply returns the RAW JSON output as per the method "getAllApps" and the other method "getAllOrgs" to get Organizations strips out what we don't want and adds it to a list of POJO that define exactly what we want to return.
3. Of course we have the standard SpringBoot main class which ensures we us an embedded tomcat server to server the REST end points
4. The POJO is as follows
Once our Spring Boot application is running we can simply invoke one of the REST end points as follows and it will login as well as make the REST call using the CF REST API under the covers for us.
pasapicella@pas-macbook:~/apps$ curl http://localhost:8080/cf-orgs | jq -r
[
{
"name": "APJ",
"status": "active",
"spacesUrl": "/v2/organizations/b7ec654f-f7fd-40e2-a4f7-841379d396d7/spaces"
},
{
"name": "apples-pivotal-org",
"status": "active",
"spacesUrl": "/v2/organizations/64c067c1-2e19-4d14-aa3f-38c07c46d552/spaces"
},
{
"name": "Suncorp",
"status": "active",
"spacesUrl": "/v2/organizations/dd06618f-a062-4fbc-b8e9-7b829d9eaf37/spaces"
}
]
More Information
1. Cloud Foundry REST API - https://apidocs.cloudfoundry.org/246/
2. RestTemplate - http://docs.spring.io/spring-framework/docs/current/javadoc-api/org/springframework/web/client/RestTemplate.html
Cloud Foundry REST API - https://apidocs.cloudfoundry.org/246/
Below shows just the organizations name and I am filtering on that using JQ, if you wnat to see all the output then remove the PIPE or JQ. You have to be logged in to use "cf oauth-token"
pasapicella@pas-macbook:~/apps$ curl -k "https://api.run.pivotal.io/v2/organizations" -X GET -H "Authorization: `cf oauth-token`" | jq -r ".resources[].entity.name"
APJ
apples-pivotal-org
Suncorp
In the example below I will show how you would invoke this REST API using SpringBoot's RestTemplate.
1. Firstly we need to retrieve our bearer token as we will need that for all API calls into the CF REST API. The code below will retrieve that for us using the RestTemplate
package com.pivotal.platform.pcf;

import org.apache.tomcat.util.codec.binary.Base64;
import org.slf4j.Logger;
import org.slf4j.LoggerFactory;
import org.springframework.boot.json.JsonParser;
import org.springframework.boot.json.JsonParserFactory;
import org.springframework.http.HttpEntity;
import org.springframework.http.HttpHeaders;
import org.springframework.http.MediaType;
import org.springframework.web.client.RestTemplate;

import java.util.Arrays;
import java.util.Map;

public class Utils
{
    private final static String username = "papicella@pivotal.io";
    private final static String password = "PASSWORD";
    private static final Logger log = LoggerFactory.getLogger(Utils.class);
    private static final JsonParser parser = JsonParserFactory.getJsonParser();

    public static String getAccessToken ()
    {
        String uri = "https://login.run.pivotal.io/oauth/token";
        String data = "username=%s&password=%s&client_id=cf&grant_type=password&response_type=token";
        RestTemplate restTemplate = new RestTemplate();

        // HTTP POST call with data

        HttpHeaders headers = new HttpHeaders();

        headers.add("Authorization", "Basic " + encodePassword());
        headers.add("Content-Type", "application/x-www-form-urlencoded");

        headers.setAccept(Arrays.asList(MediaType.APPLICATION_JSON));

        String postArgs = String.format(data, username, password);

        HttpEntity<String> requestEntity = new HttpEntity<String>(postArgs,headers);

        String response = restTemplate.postForObject(uri, requestEntity, String.class);

        Map<String, Object> jsonMap = parser.parseMap(response);

        String accessToken = (String) jsonMap.get("access_token");

        return accessToken;
    }

    private static String encodePassword()
    {
        String auth = "cf:";
        byte[] plainCredsBytes = auth.getBytes();
        byte[] base64CredsBytes = Base64.encodeBase64(plainCredsBytes);
        return new String(base64CredsBytes);
    }

}
To achieve the same thing as above using CURL would look as follows, I have stripped the actual bearer token as that is a lot of TEXT.
pasapicella@pas-macbook:~$ curl -v -XPOST -H "Application/json" -u "cf:" --data "username=papicella@pivotal.io&password=PASSWORD&client_id=cf&grant_type=password&response_type=token" https://login.run.pivotal.io/oauth/token
...
{"access_token":"YYYYYYYYYYY ....","token_type":"bearer","refresh_token":"3dd9a2b63f3640c38eb8220e2ae88dfc-r","expires_in":599,"scope":"openid uaa.user cloud_controller.read password.write cloud_controller.write","jti":"c3706c86e376445686a0dd289262bbfa"}
2. Once we have the bearer token we can then make calls to the CF REST API using the bearer token as shown below. The code below simply ensures we get the bearer token before we make the calls to the CF REST API and then we are free to output what we want to output. One method below simply returns the RAW JSON output as per the method "getAllApps" and the other method "getAllOrgs" to get Organizations strips out what we don't want and adds it to a list of POJO that define exactly what we want to return.
package com.pivotal.platform.pcf;

import com.fasterxml.jackson.databind.ObjectMapper;
import com.pivotal.platform.pcf.beans.Organization;
import org.slf4j.Logger;
import org.slf4j.LoggerFactory;
import org.springframework.boot.json.JsonParser;
import org.springframework.boot.json.JsonParserFactory;
import org.springframework.http.HttpEntity;
import org.springframework.http.HttpHeaders;
import org.springframework.http.HttpMethod;
import org.springframework.http.MediaType;
import org.springframework.web.bind.annotation.RequestMapping;
import org.springframework.web.bind.annotation.RequestMethod;
import org.springframework.web.bind.annotation.RestController;
import org.springframework.web.client.RestTemplate;

import java.util.*;

@RestController
public class CFRestAPISpringBoot
{
    private RestTemplate restTemplate = new RestTemplate();
    private static final Logger log = LoggerFactory.getLogger(CFRestAPISpringBoot.class);
    private static final JsonParser parser = JsonParserFactory.getJsonParser();

    @RequestMapping(value = "/cf-apps", method = RequestMethod.GET, path = "/cf-apps")
    public String getAllApps ()
    {
        String uri = "https://api.run.pivotal.io/v2/apps";

        String accessToken = Utils.getAccessToken();

        // Make CF REST API call for Applications
        HttpHeaders headers = new HttpHeaders();
        headers.set("Authorization", String.format("Bearer %s", accessToken));
        headers.setAccept(Arrays.asList(MediaType.APPLICATION_JSON));

        HttpEntity entity = new HttpEntity(headers);

        log.info("CF REST API Call - " + uri);

        HttpEntity<String> response = restTemplate.exchange(uri, HttpMethod.GET, entity, String.class);

        return response.getBody();
    }

    @RequestMapping(value = "/cf-orgs", method = RequestMethod.GET, path = "/cf-orgs")
    public List<Organization> getAllOrgs ()
    {
        String uri = "https://api.run.pivotal.io/v2/organizations";

        String accessToken = Utils.getAccessToken();

        // Make CF REST API call for Applications
        HttpHeaders headers = new HttpHeaders();
        headers.set("Authorization", String.format("Bearer %s", accessToken));
        headers.setAccept(Arrays.asList(MediaType.APPLICATION_JSON));

        HttpEntity entity = new HttpEntity(headers);

        log.info("CF REST API Call - " + uri);
        HttpEntity<String> response = restTemplate.exchange(uri, HttpMethod.GET, entity, String.class);

        log.info(response.getBody());

        Map<String, Object> jsonMap = parser.parseMap(response.getBody());

        List<Object> resourcesList = (List<Object>) jsonMap.get("resources");
        ObjectMapper mapper = new ObjectMapper();
        ArrayList<Organization> orgs = new ArrayList<Organization>();

        for (Object item: resourcesList)
        {
            Map map = (Map) item;

            Iterator entries = map.entrySet().iterator();

            while (entries.hasNext())
            {
                Map.Entry thisEntry = (Map.Entry) entries.next();
                if (thisEntry.getKey().toString().equals("entity"))
                {
                    Map entityMap = (Map) thisEntry.getValue();
                    Organization org =
                            new Organization((String)entityMap.get("name"),
                                             (String)entityMap.get("status"),
                                             (String)entityMap.get("spaces_url"));
                    log.info(org.toString());
                    orgs.add(org);
                }

            }

        }

        return orgs;
    }
}
3. Of course we have the standard SpringBoot main class which ensures we us an embedded tomcat server to server the REST end points
package com.pivotal.platform.pcf;

import org.springframework.boot.SpringApplication;
import org.springframework.boot.autoconfigure.SpringBootApplication;

@SpringBootApplication
public class SpringBootCfRestApiApplication {

 public static void main(String[] args)
 {
  SpringApplication.run(SpringBootCfRestApiApplication.class, args);
 }
}
4. The POJO is as follows
package com.pivotal.platform.pcf.beans;

public final class Organization
{
    private String name;
    private String status;
    private String spacesUrl;

    public Organization()
    {
    }

    public Organization(String name, String status, String spacesUrl) {
        this.name = name;
        this.status = status;
        this.spacesUrl = spacesUrl;
    }

    public String getName() {
        return name;
    }

    public void setName(String name) {
        this.name = name;
    }

    public String getStatus() {
        return status;
    }

    public void setStatus(String status) {
        this.status = status;
    }

    public String getSpacesUrl() {
        return spacesUrl;
    }

    public void setSpacesUrl(String spacesUrl) {
        this.spacesUrl = spacesUrl;
    }

    @Override
    public String toString() {
        return "Organization{" +
                "name='" + name + '\'' +
                ", status='" + status + '\'' +
                ", spacesUrl='" + spacesUrl + '\'' +
                '}';
    }
}
Once our Spring Boot application is running we can simply invoke one of the REST end points as follows and it will login as well as make the REST call using the CF REST API under the covers for us.
pasapicella@pas-macbook:~/apps$ curl http://localhost:8080/cf-orgs | jq -r
[
{
"name": "APJ",
"status": "active",
"spacesUrl": "/v2/organizations/b7ec654f-f7fd-40e2-a4f7-841379d396d7/spaces"
},
{
"name": "apples-pivotal-org",
"status": "active",
"spacesUrl": "/v2/organizations/64c067c1-2e19-4d14-aa3f-38c07c46d552/spaces"
},
{
"name": "Suncorp",
"status": "active",
"spacesUrl": "/v2/organizations/dd06618f-a062-4fbc-b8e9-7b829d9eaf37/spaces"
}
]
More Information
1. Cloud Foundry REST API - https://apidocs.cloudfoundry.org/246/
2. RestTemplate - http://docs.spring.io/spring-framework/docs/current/javadoc-api/org/springframework/web/client/RestTemplate.html
Tuesday, 8 November 2016
Declarative REST Client Feign with Spring Boot
Feign is a declarative web service client. It makes writing web service clients easier. To use Feign create an interface and annotate it. It has pluggable annotation support including Feign annotations and JAX-RS annotations. Feign also supports pluggable encoders and decoders.
In this example I show how to use Spring Cloud / Spring Boot application with Feign. The source code for this is as follows
https://github.com/papicella/SpringBootEmployeeFeignClient
1. Include the required maven dependency for Feign as shown below
2. Assuming your going to lookup a service using Service Discovery with Spring Cloud then include this dependency as well, the example below is doing this using Spring Cloud Service Discovery.
See the Spring Cloud Project page for details on setting up your build system with the current Spring Cloud Release Train
3. To enable Feign we simple add the annotation @EnableFeignClients as shown below
4. Next we have to create an interface to call our service methods. The interface methods must match the service method signatures as shown below. In this example we use Spring Cloud service discovery to find our service and invoke the right implementation method, Feign can do more then just call registered services through spring cloud service discovery BUT this example does that.
EmployeeServiceClient Interface
So what does the actual service method look like?
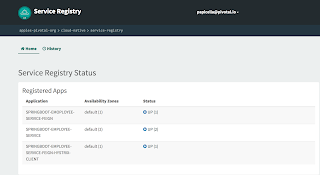
5. It's important to note that the Feign client is calling a service method using Spring Cloud service discovery , the screen shot below shows how it looks inside Pivotal Cloud Foundry when we select out service registry instance and click on Manage
6. Finally we just need to call our service using the Feign client interface and do do that with Autowire as required. In this example below we use a class annotated with @Controller as shown below which then using the returned data to display the results to a web page using Thymeleaf
7. The Web page "employees.html" fragment accessing the returned List of employees is as follows.
More Information
1. Spring Cloud
http://projects.spring.io/spring-cloud/
2. Declarative REST Client: Feign
http://cloud.spring.io/spring-cloud-netflix/spring-cloud-netflix.html#spring-cloud-feign
In this example I show how to use Spring Cloud / Spring Boot application with Feign. The source code for this is as follows
https://github.com/papicella/SpringBootEmployeeFeignClient
1. Include the required maven dependency for Feign as shown below
<dependency>
  <groupId>org.springframework.cloud</groupId>
  <artifactId>spring-cloud-starter-feign</artifactId>
</dependency>
2. Assuming your going to lookup a service using Service Discovery with Spring Cloud then include this dependency as well, the example below is doing this using Spring Cloud Service Discovery.
<dependency>
  <groupId>io.pivotal.spring.cloud</groupId>
  <artifactId>spring-cloud-services-starter-service-registry</artifactId>
</dependency>
See the Spring Cloud Project page for details on setting up your build system with the current Spring Cloud Release Train
3. To enable Feign we simple add the annotation @EnableFeignClients as shown below
package pas.au.scs.demo;

import org.springframework.boot.SpringApplication;
import org.springframework.boot.autoconfigure.SpringBootApplication;
import org.springframework.cloud.client.discovery.EnableDiscoveryClient;
import org.springframework.cloud.netflix.feign.EnableFeignClients;

@SpringBootApplication
@EnableDiscoveryClient
@EnableFeignClients
public class SpringBootEmployeeFeignClientApplication {

 public static void main(String[] args) {
  SpringApplication.run(SpringBootEmployeeFeignClientApplication.class, args);
 }
}
4. Next we have to create an interface to call our service methods. The interface methods must match the service method signatures as shown below. In this example we use Spring Cloud service discovery to find our service and invoke the right implementation method, Feign can do more then just call registered services through spring cloud service discovery BUT this example does that.
EmployeeServiceClient Interface
package pas.au.scs.demo.employee;

import org.springframework.cloud.netflix.feign.FeignClient;
import org.springframework.web.bind.annotation.RequestMapping;
import org.springframework.web.bind.annotation.RequestMethod;

import java.util.List;

@FeignClient("SPRINGBOOT-EMPLOYEE-SERVICE")
public interface EmployeeServiceClient
{
    @RequestMapping(method = RequestMethod.GET, value = "/emps")
    List<Employee> listEmployees();
}
So what does the actual service method look like?
@RestController
public class EmployeeRest
{
    private static Log logger = LogFactory.getLog(EmployeeRest.class);
    private EmployeeRepository employeeRepository;

    @Autowired
    public EmployeeRest(EmployeeRepository employeeRepository)
    {
        this.employeeRepository = employeeRepository;
    }

    @RequestMapping(value = "/emps",
                    method = RequestMethod.GET,
                    produces = MediaType.APPLICATION_JSON_VALUE)
    public List<Employee> listEmployees()
    {
        logger.info("REST request to get all Employees");
        List<Employee> emps = employeeRepository.findAll();

        return emps;
    }

    .....
5. It's important to note that the Feign client is calling a service method using Spring Cloud service discovery , the screen shot below shows how it looks inside Pivotal Cloud Foundry when we select out service registry instance and click on Manage

6. Finally we just need to call our service using the Feign client interface and do do that with Autowire as required. In this example below we use a class annotated with @Controller as shown below which then using the returned data to display the results to a web page using Thymeleaf
package pas.au.scs.demo.controller;

import org.slf4j.Logger;
import org.slf4j.LoggerFactory;
import org.springframework.beans.factory.annotation.Autowired;
import org.springframework.stereotype.Controller;
import org.springframework.ui.Model;
import org.springframework.web.bind.annotation.RequestMapping;
import org.springframework.web.bind.annotation.RequestMethod;
import pas.au.scs.demo.employee.EmployeeServiceClient;

@Controller
public class EmployeeFeignController
{
    Logger logger = LoggerFactory.getLogger(EmployeeFeignController.class);

    @Autowired
    private EmployeeServiceClient employeeServiceClient;

    @RequestMapping(value = "/", method = RequestMethod.GET)
    public String homePage(Model model) throws Exception
    {
        model.addAttribute("employees", employeeServiceClient.listEmployees());

        return "employees";
    }

}
7. The Web page "employees.html" fragment accessing the returned List of employees is as follows.
<div class="col-xs-12">
    <table id="example" class="table table-hover table-bordered table-striped table-condensed">
        <thead>
        <tr>
            <th>Id</th>
            <th>Name</th>
            <th>Job</th>
            <th>Mgr</th>
            <th>Salary</th>
        </tr>
        </thead>
        <tbody>
        <tr th:each="employee : ${employees}">
            <td th:text="${employee.id}"></td>
            <td th:text="${employee.name}"></td>
            <td th:text="${employee.job}"></td>
            <td th:text="${employee.mgr}"></td>
            <td th:text="${employee.salary}"></td>
        </tr>
        </tbody>
    </table>
</div>
More Information
1. Spring Cloud
http://projects.spring.io/spring-cloud/
2. Declarative REST Client: Feign
http://cloud.spring.io/spring-cloud-netflix/spring-cloud-netflix.html#spring-cloud-feign
Tuesday, 11 October 2016
Pushing a Docker image using Docker Hub on Pivotal Cloud Foundry
In this example I will show how to push a Docker image to Pivotal Cloud Foundry (PCF) using Docker Hub. You can use your own private Docker Registry BUT here I am using Docker Hub in this example.
The example spring boot application which can easily created as a Docker Image is per this spring guide below.
https://spring.io/guides/gs/spring-boot-docker/
1. First we need to ensure the docker is enabled on Diego as shown below.
pasapicella@pas-macbook:~$ cf feature-flag diego_docker
Retrieving status of diego_docker as admin...
OK
Features State
diego_docker enabled
Note: If it's not enabled you would need ADMIN rights to set it as follows
$ cf enable-feature-flag diego_docker
2. Login to Docker Hub from the command line
pasapicella@pas-macbook:~/pivotal/software/docker$ docker login -u pasapples -p ******
Login Succeeded
3. Push your local Docker image to your public Docker Hub Repository as follows
This assumes you have an IMAGE to push as per below.
pasapicella@pas-macbook:~/pivotal/software/docker$ docker images
REPOSITORY TAG IMAGE ID CREATED SIZE
pasapples/cf 0.0.1 b25e9b214774 3 days ago 881.4 MB
pasapples/gs-spring-boot-docker latest 5fc76927eca2 3 days ago 195.5 MB
gregturn/gs-spring-boot-docker latest a813439710d3 3 days ago 195.4 MB
ubuntu 14.04 f2d8ce9fa988 2 weeks ago 187.9 MB
frolvlad/alpine-oraclejdk8 slim f8103909759b 2 weeks ago 167.1 MB
springio/gs-spring-boot-docker latest 688d6c4ab4d3 18 months ago 609.9 MB
** Push to Docker Hub **
$ docker push pasapples/gs-spring-boot-docker
The push refers to a repository [docker.io/pasapples/gs-spring-boot-docker]
1a701a998f45: Layer already exists
0d4e0b525d4f: Layer already exists
a27c88827076: Pushed
58f7b9930e4f: Layer already exists
9007f5987db3: Layer already exists
latest: digest: sha256:6b3ccae43e096b1fa4d288900c6d2328e34f11e286996ffa582961bad599aee9 size: 1375
4. Login to Docker Hub and verify it's loaded as shown below
https://hub.docker.com/

At this point we are ready to Deploy to our PCF instance and it's assumed you have already logged into the instance prior to running this next step
5. Push as shown below to PCF
pasapicella@pas-macbook:~$ cf push springboot-docker --docker-image pasapples/gs-spring-boot-docker --random-route -i 1 -m 512M -t 180
Creating app springboot-docker in org apples-org / space development as papicella@pivotal.io...
OK
Creating route springboot-docker-oological-superseniority.apps.pcfdemo.net...
OK
Binding springboot-docker-oological-superseniority.apps.pcfdemo.net to springboot-docker...
OK
Starting app springboot-docker in org apples-org / space development as papicella@pivotal.io...
Creating container
Successfully created container
Staging...
Staging process started ...
Staging process finished
Exit status 0
Staging Complete
Destroying container
Successfully destroyed container
0 of 1 instances running, 1 starting
0 of 1 instances running, 1 starting
0 of 1 instances running, 1 starting
0 of 1 instances running, 1 starting
0 of 1 instances running, 1 starting
0 of 1 instances running, 1 starting
0 of 1 instances running, 1 starting
0 of 1 instances running, 1 starting
0 of 1 instances running, 1 starting
0 of 1 instances running, 1 starting
0 of 1 instances running, 1 starting
0 of 1 instances running, 1 starting
0 of 1 instances running, 1 starting
0 of 1 instances running, 1 starting
0 of 1 instances running, 1 starting
0 of 1 instances running, 1 starting
0 of 1 instances running, 1 starting
1 of 1 instances running
App started
OK
App springboot-docker was started using this command `java -Djava.security.egd=file:/dev/./urandom -jar /app.jar `
Showing health and status for app springboot-docker in org apples-org / space development as papicella@pivotal.io...
OK
requested state: started
instances: 1/1
usage: 512M x 1 instances
urls: springboot-docker-oological-superseniority.apps.pcfdemo.net
last uploaded: Tue Oct 11 02:04:42 UTC 2016
stack: unknown
buildpack: unknown
state since cpu memory disk details
#0 running 2016-10-11 01:07:34 PM 104.3% 309.3M of 512M 1.4M of 1G

You can generate an application.yml as shown below
pasapicella@pas-macbook:~$ cf create-app-manifest springboot-docker
Creating an app manifest from current settings of app springboot-docker ...
OK
Manifest file created successfully at ./springboot-docker_manifest.yml
pasapicella@pas-macbook:~$ cat springboot-docker_manifest.yml
applications:
- name: springboot-docker
instances: 1
memory: 512M
disk_quota: 1024M
host: springboot-docker-oological-superseniority
domain: apps.pcfdemo.net
stack: cflinuxfs2
timeout: 180
More Information
http://docs.pivotal.io/pivotalcf/1-8/adminguide/docker.html
The example spring boot application which can easily created as a Docker Image is per this spring guide below.
https://spring.io/guides/gs/spring-boot-docker/
1. First we need to ensure the docker is enabled on Diego as shown below.
pasapicella@pas-macbook:~$ cf feature-flag diego_docker
Retrieving status of diego_docker as admin...
OK
Features State
diego_docker enabled
Note: If it's not enabled you would need ADMIN rights to set it as follows
$ cf enable-feature-flag diego_docker
2. Login to Docker Hub from the command line
pasapicella@pas-macbook:~/pivotal/software/docker$ docker login -u pasapples -p ******
Login Succeeded
3. Push your local Docker image to your public Docker Hub Repository as follows
This assumes you have an IMAGE to push as per below.
pasapicella@pas-macbook:~/pivotal/software/docker$ docker images
REPOSITORY TAG IMAGE ID CREATED SIZE
pasapples/cf 0.0.1 b25e9b214774 3 days ago 881.4 MB
pasapples/gs-spring-boot-docker latest 5fc76927eca2 3 days ago 195.5 MB
gregturn/gs-spring-boot-docker latest a813439710d3 3 days ago 195.4 MB
ubuntu 14.04 f2d8ce9fa988 2 weeks ago 187.9 MB
frolvlad/alpine-oraclejdk8 slim f8103909759b 2 weeks ago 167.1 MB
springio/gs-spring-boot-docker latest 688d6c4ab4d3 18 months ago 609.9 MB
** Push to Docker Hub **
$ docker push pasapples/gs-spring-boot-docker
The push refers to a repository [docker.io/pasapples/gs-spring-boot-docker]
1a701a998f45: Layer already exists
0d4e0b525d4f: Layer already exists
a27c88827076: Pushed
58f7b9930e4f: Layer already exists
9007f5987db3: Layer already exists
latest: digest: sha256:6b3ccae43e096b1fa4d288900c6d2328e34f11e286996ffa582961bad599aee9 size: 1375
4. Login to Docker Hub and verify it's loaded as shown below
https://hub.docker.com/

At this point we are ready to Deploy to our PCF instance and it's assumed you have already logged into the instance prior to running this next step
5. Push as shown below to PCF
pasapicella@pas-macbook:~$ cf push springboot-docker --docker-image pasapples/gs-spring-boot-docker --random-route -i 1 -m 512M -t 180
Creating app springboot-docker in org apples-org / space development as papicella@pivotal.io...
OK
Creating route springboot-docker-oological-superseniority.apps.pcfdemo.net...
OK
Binding springboot-docker-oological-superseniority.apps.pcfdemo.net to springboot-docker...
OK
Starting app springboot-docker in org apples-org / space development as papicella@pivotal.io...
Creating container
Successfully created container
Staging...
Staging process started ...
Staging process finished
Exit status 0
Staging Complete
Destroying container
Successfully destroyed container
0 of 1 instances running, 1 starting
0 of 1 instances running, 1 starting
0 of 1 instances running, 1 starting
0 of 1 instances running, 1 starting
0 of 1 instances running, 1 starting
0 of 1 instances running, 1 starting
0 of 1 instances running, 1 starting
0 of 1 instances running, 1 starting
0 of 1 instances running, 1 starting
0 of 1 instances running, 1 starting
0 of 1 instances running, 1 starting
0 of 1 instances running, 1 starting
0 of 1 instances running, 1 starting
0 of 1 instances running, 1 starting
0 of 1 instances running, 1 starting
0 of 1 instances running, 1 starting
0 of 1 instances running, 1 starting
1 of 1 instances running
App started
OK
App springboot-docker was started using this command `java -Djava.security.egd=file:/dev/./urandom -jar /app.jar `
Showing health and status for app springboot-docker in org apples-org / space development as papicella@pivotal.io...
OK
requested state: started
instances: 1/1
usage: 512M x 1 instances
urls: springboot-docker-oological-superseniority.apps.pcfdemo.net
last uploaded: Tue Oct 11 02:04:42 UTC 2016
stack: unknown
buildpack: unknown
state since cpu memory disk details
#0 running 2016-10-11 01:07:34 PM 104.3% 309.3M of 512M 1.4M of 1G

pasapicella@pas-macbook:~$ cf create-app-manifest springboot-docker
Creating an app manifest from current settings of app springboot-docker ...
OK
Manifest file created successfully at ./springboot-docker_manifest.yml
pasapicella@pas-macbook:~$ cat springboot-docker_manifest.yml
applications:
- name: springboot-docker
instances: 1
memory: 512M
disk_quota: 1024M
host: springboot-docker-oological-superseniority
domain: apps.pcfdemo.net
stack: cflinuxfs2
timeout: 180
More Information
http://docs.pivotal.io/pivotalcf/1-8/adminguide/docker.html
Monday, 10 October 2016
Displaying Pivotal Cloud Foundry application Instances Buildpacks or Docker Images using CF CLI
I was recently asked how you could display all PCF application instances detected buildpack OR docker image being used from the command line. The CF REST API gives you all of this information and more as per the documentation below to list all applications.
https://apidocs.cloudfoundry.org/244/apps/list_all_apps.html
This API call gives you lots of information so to filter that a fellow work college created this script to get just the output we want. You need to be logged into your PCF instance with "cf login" prior to running this script because it's using "CF CURL" rather then calling the REST API directly
guids=$(cf curl /v2/apps?q=space_guid:`cf space development --guid` | jq -r ".resources[].metadata.guid")
echo -e "App Name, Buildpack, Docker"
for guid in $guids; do
appName=$(cf curl /v2/apps/$guid/summary | jq -r ".name")
buildpack=$(cf curl /v2/apps/$guid/summary | jq -r ".detected_buildpack")
docker_image=$(cf curl /v2/apps/$guid/summary | jq -r ".docker_image")
echo -e "$appName," "$buildpack," "$docker_image"
done
Output:
App Name, Buildpack, Docker
guestbook-backend, null, jamesclonk/guestbook-backend:latest
springboot-docker, null, pasapples/gs-spring-boot-docker:latest
pas-albums, java-buildpack=v3.8.1-offline-https://github.com/cloudfoundry/java-buildpack.git#29c79f2 java-main java-opts open-jdk-like-jre=1.8.0_91-unlimited-crypto open-jdk-like-memory-calculator=2.0.2_RELEASE spring-auto-reconfiguration=1.10.0_RELEASE, null
To use the REST API directly replace
guids=$(cf curl /v2/apps?q=space_guid:`cf space development --guid` | jq -r ".resources[].metadata.guid")
WITH
guids=$(curl -k https://api.run.pivotal.io/v2/apps?q=space_guid:`cf space development --guid` -X GET -H "Authorization: `cf oauth-token`" | jq -r ".resources[].metadata.guid")
Thursday, 6 October 2016
Reading VCAP_SERVICES and VCAP_APPLICATION from a Spring Boot Rest Controller in PCF
Note for myself: Reading PCF System and ENV variables
Utils.java (Referenced in Code above)
package com.example;

import org.slf4j.Logger;
import org.slf4j.LoggerFactory;
import org.springframework.web.bind.annotation.PathVariable;
import org.springframework.web.bind.annotation.RequestMapping;
import org.springframework.web.bind.annotation.RequestMethod;
import org.springframework.web.bind.annotation.RestController;

import java.util.Map;

@RestController
public class DemoRest
{
    private static final Logger logger = LoggerFactory.getLogger(DemoRest.class);

    @RequestMapping(value = "/version", method = RequestMethod.GET)
    public String version()
    {
        return "1.0";
    }

    @RequestMapping(value = "/vcapapplication", method = RequestMethod.GET)
    public Map vcapApplication() throws Exception
    {
        return Utils.getEnvMap("VCAP_APPLICATION");
    }

    @RequestMapping(value = "/vcapservices", method = RequestMethod.GET)
    public Map vcapServices() throws Exception
    {
        return Utils.getEnvMap("VCAP_SERVICES");
    }

    @RequestMapping(value = "/vcapservices_json", method = RequestMethod.GET)
    public String vcapServicesJSON() throws Exception
    {
        return System.getenv().get("VCAP_SERVICES");
    }


    @RequestMapping(value = "/appindex", method = RequestMethod.GET)
    public String appIndex() throws Exception
    {
        String instanceIndex = "N/A";

        try
        {
            instanceIndex =
                    Utils.getEnvMap("VCAP_APPLICATION").getOrDefault("instance_index", "N/A").toString();
        }
        catch (Exception ex)
        {
           logger.info("Exception getting application index : " + ex.getMessage());
        }

        return instanceIndex;
    }

    @RequestMapping(value = "/getEnvVariable/{env_var}", method = RequestMethod.GET)
    public String getEnvVariable(@PathVariable String env_var)
    {
        return System.getenv().get(env_var);
    }

}
Utils.java (Referenced in Code above)
package com.example;

import com.fasterxml.jackson.databind.ObjectMapper;

import java.util.HashMap;
import java.util.Map;

public class Utils
{
    public static Map getEnvMap(String vcap) throws Exception
    {
        String vcapEnv = System.getenv(vcap);
        ObjectMapper mapper = new ObjectMapper();

        if (vcapEnv != null) {
            Map<String, ?> vcapMap = mapper.readValue(vcapEnv, Map.class);
            return vcapMap;
        }

        return new HashMap<String, String>();
    }
}
Friday, 23 September 2016
Using Oracle 12c with Pivotal Cloud Foundry Applications and Spring Boot
In this post I walk through what it would take to access Oracle 12c using a spring boot application deployed to Pivotal Cloud Foundry PCF all from my Macbook Pro. Of course this can be done outside of an isolated laptop like my Macbook Pro but handy while doing DEV/TEST and still being able to use Oracle 12c.
Requirements
1. First you will need a 12c Database and the best way to do that is to use this Oracle VM image below. I use VirtualBox to start that up and it gives me a working 12c database out of the box.
http://www.oracle.com/technetwork/community/developer-vm/index.html#dbapp
Once imported into VirtualPort you will want to configure the Network to allow port forwarding on the database listener port of 1521 and perhaps SSH into port 22 if you need that. The 1521 Port Forward rule is vital to ensure your Macbook localhost can access the database VM using the listener port. It's setup as follows.

2. This isn't required but installing the Oracle 12c instant client will give you SQL*Plus and to me that's vital. You could use a GUI tool if that's what you like but for me SQL*Plus is more then good enough. Here is the link for Mac Os X install.
http://www.oracle.com/technetwork/topics/intel-macsoft-096467.html
Verify Setup:
Note: I am using the IP address of my local Macbook pro. I could use "localhost" as I have setup a Port Forward rule to enable that BUT given I am using PCFDev it will need the IP address of my local Macbook pro to ensure it's talking to the right host to get to the Oracle 12c instance VM.
pasapicella@pas-macbook:~/pivotal/software/oracle$ sqlplus scott/tiger@10.47.253.3/orcl
SQL*Plus: Release 12.1.0.2.0 Production on Fri Sep 23 15:57:11 2016
Copyright (c) 1982, 2016, Oracle. All rights reserved.
Last Successful login time: Fri Sep 23 2016 15:48:26 +10:00
Connected to:
Oracle Database 12c Enterprise Edition Release 12.1.0.2.0 - 64bit Production
With the Partitioning, OLAP, Advanced Analytics and Real Application Testing options
SCOTT@10.47.253.3/orcl>
3. I use PCFDev and the reason is it's local to my MacBook Pro and I can get it to talk to the Oracle 12c instance easily. You can use any PCF as long as you have network access to your Oracle 12c instance.
Download from here : https://network.pivotal.io/products/pcfdev
Docs are here : https://docs.pivotal.io/pcf-dev/
At this point your ready to go , so follow these steps to test your setup
4. Clone Spring Music as follows
$ git clone https://github.com/cloudfoundry-samples/spring-music.git
5. Download the Oracle 12c JDBC driver from the location below and place it into "src/main/webapp/WEB-INF/lib" folder
http://www.oracle.com/technetwork/database/features/jdbc/jdbc-drivers-12c-download-1958347.html
6. Package as follows
$ ./gradlew assemble
7. Now lets create a CUPS service to enable our application to bind to Oracle 12c we do that as follows
Note: It's vital we use the IP address of your local Macbook Pro as PCFDev itself is a VM which referencing "localhost" will not find the Oracle Database instance
pasapicella@pas-macbook:~/apps/pcf-dev/demos/spring-music$ cf create-user-provided-service oracle-db -p '{"uri":"oracle://scott:tiger@10.47.253.3:1521/orcl"}'
Creating user provided service oracle-db in org pcfdev-org / space pcfdev-space as admin...
OK
8. Now lets create a file called manifest-oracle.yml to use the CUPS service as shown below
---
applications:
- name: spring-music
memory: 512M
instances: 1
random-route: true
path: build/libs/spring-music.war
services:
- oracle-db
9. Push as follows
$ cf push -f manifest-oracle.yml
Output:
pasapicella@pas-macbook:~/apps/pcf-dev/demos/spring-music$ cf push -f manifest-oracle.yml
Using manifest file manifest-oracle.yml
Creating app spring-music in org pcfdev-org / space pcfdev-space as admin...
OK
Creating route spring-music-apiaceous-interviewer.local.pcfdev.io...
OK
Binding spring-music-apiaceous-interviewer.local.pcfdev.io to spring-music...
OK
Uploading spring-music...
Uploading app files from: /var/folders/c3/27vscm613fjb6g8f5jmc2x_w0000gp/T/unzipped-app274683538
Uploading 457K, 88 files
Done uploading
OK
Binding service oracle-db to app spring-music in org pcfdev-org / space pcfdev-space as admin...
OK
Starting app spring-music in org pcfdev-org / space pcfdev-space as admin...
Downloading binary_buildpack...
Downloading java_buildpack...
Downloading ruby_buildpack...
Downloading staticfile_buildpack...
Downloading nodejs_buildpack...
Downloading go_buildpack...
Downloading python_buildpack...
Downloading php_buildpack...
Downloaded java_buildpack
Downloaded binary_buildpack
Downloaded python_buildpack
Downloaded nodejs_buildpack
Downloaded ruby_buildpack
Downloaded go_buildpack
Downloaded staticfile_buildpack
Downloaded php_buildpack
Creating container
Successfully created container
Downloading app package...
Downloaded app package (27.5M)
Staging...
-----> Java Buildpack Version: v3.6 (offline) | https://github.com/cloudfoundry/java-buildpack.git#5194155
-----> Downloading Open Jdk JRE 1.8.0_71 from https://download.run.pivotal.io/openjdk/trusty/x86_64/openjdk-1.8.0_71.tar.gz (found in cache)
Expanding Open Jdk JRE to .java-buildpack/open_jdk_jre (1.2s)
-----> Downloading Open JDK Like Memory Calculator 2.0.1_RELEASE from https://download.run.pivotal.io/memory-calculator/trusty/x86_64/memory-calculator-2.0.1_RELEASE.tar.gz (found in cache)
Memory Settings: -Xmx382293K -XX:MaxMetaspaceSize=64M -Xss995K -Xms382293K -XX:MetaspaceSize=64M
-----> Downloading Spring Auto Reconfiguration 1.10.0_RELEASE from https://download.run.pivotal.io/auto-reconfiguration/auto-reconfiguration-1.10.0_RELEASE.jar (found in cache)
-----> Downloading Tomcat Instance 8.0.30 from https://download.run.pivotal.io/tomcat/tomcat-8.0.30.tar.gz (found in cache)
Expanding Tomcat Instance to .java-buildpack/tomcat (0.1s)
-----> Downloading Tomcat Lifecycle Support 2.5.0_RELEASE from https://download.run.pivotal.io/tomcat-lifecycle-support/tomcat-lifecycle-support-2.5.0_RELEASE.jar (found in cache)
-----> Downloading Tomcat Logging Support 2.5.0_RELEASE from https://download.run.pivotal.io/tomcat-logging-support/tomcat-logging-support-2.5.0_RELEASE.jar (found in cache)
-----> Downloading Tomcat Access Logging Support 2.5.0_RELEASE from https://download.run.pivotal.io/tomcat-access-logging-support/tomcat-access-logging-support-2.5.0_RELEASE.jar (found in cache)
Exit status 0
Staging complete
Uploading droplet, build artifacts cache...
Uploading build artifacts cache...
Uploading droplet...
Uploaded build artifacts cache (108B)
Uploaded droplet (79.8M)
Uploading complete
0 of 1 instances running, 1 starting
1 of 1 instances running
App started
OK
App spring-music was started using this command `CALCULATED_MEMORY=$($PWD/.java-buildpack/open_jdk_jre/bin/java-buildpack-memory-calculator-2.0.1_RELEASE -memorySizes=metaspace:64m.. -memoryWeights=heap:75,metaspace:10,native:10,stack:5 -memoryInitials=heap:100%,metaspace:100% -totMemory=$MEMORY_LIMIT) && JAVA_HOME=$PWD/.java-buildpack/open_jdk_jre JAVA_OPTS="-Djava.io.tmpdir=$TMPDIR -XX:OnOutOfMemoryError=$PWD/.java-buildpack/open_jdk_jre/bin/killjava.sh $CALCULATED_MEMORY -Daccess.logging.enabled=false -Dhttp.port=$PORT" exec $PWD/.java-buildpack/tomcat/bin/catalina.sh run`
Showing health and status for app spring-music in org pcfdev-org / space pcfdev-space as admin...
OK
requested state: started
instances: 1/1
usage: 512M x 1 instances
urls: spring-music-apiaceous-interviewer.local.pcfdev.io
last uploaded: Fri Sep 23 06:14:54 UTC 2016
stack: unknown
buildpack: java-buildpack=v3.6-offline-https://github.com/cloudfoundry/java-buildpack.git#5194155 open-jdk-like-jre=1.8.0_71 open-jdk-like-memory-calculator=2.0.1_RELEASE spring-auto-reconfiguration=1.10.0_RELEASE tomcat-access-logging-support=2.5.0_RELEASE tomca...
state since cpu memory disk details
#0 running 2016-09-23 04:15:22 PM 0.0% 844K of 512M 452K of 512M
10. Verify from SQL*Plus it has created the table ALBUM in the SCOTT schema as shown below
11. Test application in a browser

Requirements
- Oracle 12c instance
- PCFDev
- Git Client
1. First you will need a 12c Database and the best way to do that is to use this Oracle VM image below. I use VirtualBox to start that up and it gives me a working 12c database out of the box.
http://www.oracle.com/technetwork/community/developer-vm/index.html#dbapp
Once imported into VirtualPort you will want to configure the Network to allow port forwarding on the database listener port of 1521 and perhaps SSH into port 22 if you need that. The 1521 Port Forward rule is vital to ensure your Macbook localhost can access the database VM using the listener port. It's setup as follows.

2. This isn't required but installing the Oracle 12c instant client will give you SQL*Plus and to me that's vital. You could use a GUI tool if that's what you like but for me SQL*Plus is more then good enough. Here is the link for Mac Os X install.
http://www.oracle.com/technetwork/topics/intel-macsoft-096467.html
Verify Setup:
Note: I am using the IP address of my local Macbook pro. I could use "localhost" as I have setup a Port Forward rule to enable that BUT given I am using PCFDev it will need the IP address of my local Macbook pro to ensure it's talking to the right host to get to the Oracle 12c instance VM.
pasapicella@pas-macbook:~/pivotal/software/oracle$ sqlplus scott/tiger@10.47.253.3/orcl
SQL*Plus: Release 12.1.0.2.0 Production on Fri Sep 23 15:57:11 2016
Copyright (c) 1982, 2016, Oracle. All rights reserved.
Last Successful login time: Fri Sep 23 2016 15:48:26 +10:00
Connected to:
Oracle Database 12c Enterprise Edition Release 12.1.0.2.0 - 64bit Production
With the Partitioning, OLAP, Advanced Analytics and Real Application Testing options
SCOTT@10.47.253.3/orcl>
3. I use PCFDev and the reason is it's local to my MacBook Pro and I can get it to talk to the Oracle 12c instance easily. You can use any PCF as long as you have network access to your Oracle 12c instance.
Download from here : https://network.pivotal.io/products/pcfdev
Docs are here : https://docs.pivotal.io/pcf-dev/
At this point your ready to go , so follow these steps to test your setup
4. Clone Spring Music as follows
$ git clone https://github.com/cloudfoundry-samples/spring-music.git
5. Download the Oracle 12c JDBC driver from the location below and place it into "src/main/webapp/WEB-INF/lib" folder
http://www.oracle.com/technetwork/database/features/jdbc/jdbc-drivers-12c-download-1958347.html
6. Package as follows
$ ./gradlew assemble
7. Now lets create a CUPS service to enable our application to bind to Oracle 12c we do that as follows
Note: It's vital we use the IP address of your local Macbook Pro as PCFDev itself is a VM which referencing "localhost" will not find the Oracle Database instance
pasapicella@pas-macbook:~/apps/pcf-dev/demos/spring-music$ cf create-user-provided-service oracle-db -p '{"uri":"oracle://scott:tiger@10.47.253.3:1521/orcl"}'
Creating user provided service oracle-db in org pcfdev-org / space pcfdev-space as admin...
OK
8. Now lets create a file called manifest-oracle.yml to use the CUPS service as shown below
---
applications:
- name: spring-music
memory: 512M
instances: 1
random-route: true
path: build/libs/spring-music.war
services:
- oracle-db
9. Push as follows
$ cf push -f manifest-oracle.yml
Output:
pasapicella@pas-macbook:~/apps/pcf-dev/demos/spring-music$ cf push -f manifest-oracle.yml
Using manifest file manifest-oracle.yml
Creating app spring-music in org pcfdev-org / space pcfdev-space as admin...
OK
Creating route spring-music-apiaceous-interviewer.local.pcfdev.io...
OK
Binding spring-music-apiaceous-interviewer.local.pcfdev.io to spring-music...
OK
Uploading spring-music...
Uploading app files from: /var/folders/c3/27vscm613fjb6g8f5jmc2x_w0000gp/T/unzipped-app274683538
Uploading 457K, 88 files
Done uploading
OK
Binding service oracle-db to app spring-music in org pcfdev-org / space pcfdev-space as admin...
OK
Starting app spring-music in org pcfdev-org / space pcfdev-space as admin...
Downloading binary_buildpack...
Downloading java_buildpack...
Downloading ruby_buildpack...
Downloading staticfile_buildpack...
Downloading nodejs_buildpack...
Downloading go_buildpack...
Downloading python_buildpack...
Downloading php_buildpack...
Downloaded java_buildpack
Downloaded binary_buildpack
Downloaded python_buildpack
Downloaded nodejs_buildpack
Downloaded ruby_buildpack
Downloaded go_buildpack
Downloaded staticfile_buildpack
Downloaded php_buildpack
Creating container
Successfully created container
Downloading app package...
Downloaded app package (27.5M)
Staging...
-----> Java Buildpack Version: v3.6 (offline) | https://github.com/cloudfoundry/java-buildpack.git#5194155
-----> Downloading Open Jdk JRE 1.8.0_71 from https://download.run.pivotal.io/openjdk/trusty/x86_64/openjdk-1.8.0_71.tar.gz (found in cache)
Expanding Open Jdk JRE to .java-buildpack/open_jdk_jre (1.2s)
-----> Downloading Open JDK Like Memory Calculator 2.0.1_RELEASE from https://download.run.pivotal.io/memory-calculator/trusty/x86_64/memory-calculator-2.0.1_RELEASE.tar.gz (found in cache)
Memory Settings: -Xmx382293K -XX:MaxMetaspaceSize=64M -Xss995K -Xms382293K -XX:MetaspaceSize=64M
-----> Downloading Spring Auto Reconfiguration 1.10.0_RELEASE from https://download.run.pivotal.io/auto-reconfiguration/auto-reconfiguration-1.10.0_RELEASE.jar (found in cache)
-----> Downloading Tomcat Instance 8.0.30 from https://download.run.pivotal.io/tomcat/tomcat-8.0.30.tar.gz (found in cache)
Expanding Tomcat Instance to .java-buildpack/tomcat (0.1s)
-----> Downloading Tomcat Lifecycle Support 2.5.0_RELEASE from https://download.run.pivotal.io/tomcat-lifecycle-support/tomcat-lifecycle-support-2.5.0_RELEASE.jar (found in cache)
-----> Downloading Tomcat Logging Support 2.5.0_RELEASE from https://download.run.pivotal.io/tomcat-logging-support/tomcat-logging-support-2.5.0_RELEASE.jar (found in cache)
-----> Downloading Tomcat Access Logging Support 2.5.0_RELEASE from https://download.run.pivotal.io/tomcat-access-logging-support/tomcat-access-logging-support-2.5.0_RELEASE.jar (found in cache)
Exit status 0
Staging complete
Uploading droplet, build artifacts cache...
Uploading build artifacts cache...
Uploading droplet...
Uploaded build artifacts cache (108B)
Uploaded droplet (79.8M)
Uploading complete
0 of 1 instances running, 1 starting
1 of 1 instances running
App started
OK
App spring-music was started using this command `CALCULATED_MEMORY=$($PWD/.java-buildpack/open_jdk_jre/bin/java-buildpack-memory-calculator-2.0.1_RELEASE -memorySizes=metaspace:64m.. -memoryWeights=heap:75,metaspace:10,native:10,stack:5 -memoryInitials=heap:100%,metaspace:100% -totMemory=$MEMORY_LIMIT) && JAVA_HOME=$PWD/.java-buildpack/open_jdk_jre JAVA_OPTS="-Djava.io.tmpdir=$TMPDIR -XX:OnOutOfMemoryError=$PWD/.java-buildpack/open_jdk_jre/bin/killjava.sh $CALCULATED_MEMORY -Daccess.logging.enabled=false -Dhttp.port=$PORT" exec $PWD/.java-buildpack/tomcat/bin/catalina.sh run`
Showing health and status for app spring-music in org pcfdev-org / space pcfdev-space as admin...
OK
requested state: started
instances: 1/1
usage: 512M x 1 instances
urls: spring-music-apiaceous-interviewer.local.pcfdev.io
last uploaded: Fri Sep 23 06:14:54 UTC 2016
stack: unknown
buildpack: java-buildpack=v3.6-offline-https://github.com/cloudfoundry/java-buildpack.git#5194155 open-jdk-like-jre=1.8.0_71 open-jdk-like-memory-calculator=2.0.1_RELEASE spring-auto-reconfiguration=1.10.0_RELEASE tomcat-access-logging-support=2.5.0_RELEASE tomca...
state since cpu memory disk details
#0 running 2016-09-23 04:15:22 PM 0.0% 844K of 512M 452K of 512M
10. Verify from SQL*Plus it has created the table ALBUM in the SCOTT schema as shown below
SCOTT@10.47.253.3:1521/orcl> describe album;
 Name           Null?    Type
 ----------------------------------------------------------------- -------- --------------------------------------------
 ID           NOT NULL VARCHAR2(40 CHAR)
 ALBUMID            VARCHAR2(255 CHAR)
 ARTIST             VARCHAR2(255 CHAR)
 GENRE             VARCHAR2(255 CHAR)
 RELEASEYEAR            VARCHAR2(255 CHAR)
 TITLE             VARCHAR2(255 CHAR)
 TRACKCOUNT          NOT NULL NUMBER(10)

SCOTT@10.47.253.3:1521/orcl>
11. Test application in a browser

Subscribe to:
Posts (Atom)